Knowledge Hub
Building a dynamic pagination component with Next.js and Strapi
Introduction
Building a modern blog requires more than compelling content. It requires efficient management of large amounts of content, which can be achieved through effective pagination. In this article, we will delve into the process of creating a dynamic pagination component using the powerful combination of Next.js and Strapi.
Next.js provides a robust framework for building React applications, while Strapi serves as a flexible headless CMS that simplifies content management.
By implementing this pagination component, you will take a significant step towards enhancing the user experience on your blog.
Prerequisites
Before we begin, make sure you have a basic understanding of Next.js and Strapi. Familiarity with JavaScript, React, and CSS will also be beneficial. Ensure that you have Node.js and npm (Node Package Manager) installed on your development machine.
Understanding pagination
Pagination is a way of dividing large datasets or content into smaller pages. It makes it easier to read and manage data. Users can navigate through pages using buttons like "previous" and "next" or page numbers. Pagination is important when working with large datasets because it can improve the user experience and system performance.
Importance of pagination
The importance of pagination is as follows:
- It improves performance by dividing the dataset into smaller chunks, which reduces load times and minimizes system resource strain.
- It enables effortless navigation by breaking the dataset into manageable pages. It prevents users from feeling overwhelmed, allowing them to explore different sections of the dataset without confusion.
- It optimizes resource allocation by loading data, which is particularly valuable in situations with limited bandwidth or concurrent user requests.
By efficiently utilizing system resources, pagination enhances the overall application efficiency.
- It enables applications to handle larger datasets while maintaining performance by loading and displaying relevant subsets of data.
Overall, pagination is a valuable tool that can improve the performance, usability, and scalability of applications.
Common pagination patterns
Pagination is a versatile tool that offers various options to cater to different scenarios. To find the ideal pagination pattern for your specific use case, it's essential to know the common variations. These include numbered pagination, infinite scrolling, and load more buttons. By understanding and assessing these patterns, you can determine the most appropriate approach that aligns with your requirements.
Numbered pagination
The traditional and recognized pattern for pagination is numbered pagination. This approach involves presenting a numbered list of page links beneath the content, enabling users to access a specific page. For instance, you might encounter page numbers like "1, 2, 3, 4, ..." accompanied by previous and next buttons for navigation purposes.
Benefits
- Provides users with clear and visible navigation choices.
- Enables swift access to desired pages.
- Delivers a familiar and intuitive browsing experience.
Suitability
- Well-suited for situations where users wish to jump to specific pages or navigate through a known quantity of pages.
- Ideal for scenarios in which the total number of pages can be estimated.
Infinite scrolling
This popular pattern loads more content as users scroll down the page. Instead of traditional pagination links, new content is appended to the existing content.
This pattern creates a continuous browsing experience without the need for explicit page navigation.
Benefits
- Offers a seamless and uninterrupted browsing experience.
- Eliminates the need for users to click on pagination links.
- Allows users to explore a large dataset.
Suitability
- Ideal for scenarios where the content is updated or where users need to explore a vast amount of content without the need for precise navigation.
- Works well for mobile applications or websites with a heavy focus on user engagement and discovery.
Load more buttons
The load more button pattern involves displaying a button at the bottom of the content that, when clicked, loads the next set of content. This pattern is similar to infinite scrolling but provides more control to users by triggering the loading of additional content.
Benefits
- Offers a compromise between traditional pagination and infinite scrolling.
- Provides users with explicit control over loading more content.
- Allows for easier tracking and measurement of user interactions.
Suitability
- Suitable for scenarios where users may want to control when new content loads.
- Ideal for cases where you want to strike a balance between user control and a seamless browsing experience.
- Works well for applications or websites where content updates are less frequent or where users may need to revisit specific sections.
It's important to consider your specific use case, content volume, and user expectations when choosing a pagination pattern.
Each pattern has its advantages and considerations, so take the time to analyze your requirements and select the approach that best aligns with your goals and enhances the user experience on your blog.
Setting up your development environment
To begin building your dynamic pagination component, install Next.js and Strapi on your development machine using npm (Node Package Manager).
Installing Nextjs
After the above installations, you can create the next app using the CLI or your code editor’s terminal. In your preferred terminal run:
npx create-next-app your-app-nameTo start your NextJS component, it is essential to configure your development environment. It involves the installation of Node.js and npm (Node Package Manager) on your computer, which will provide the necessary tools and dependencies to create components within a NextJS application.
After the above installations, you can create a next app using the CLI or your code editor’s terminal. In your preferred terminal run:
npx create-next-app your-app-nameReplace "your-project-name" with the desired name for your project.
And follow the following setup configurations:

Opening that folder with your code editor gives:
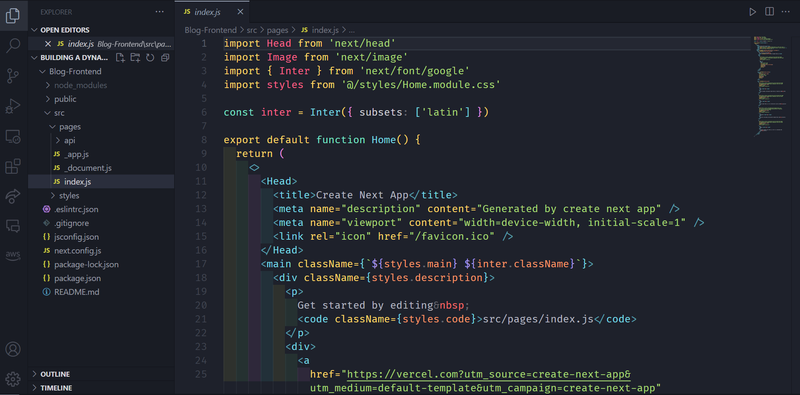
To locally host your next app, run npm run dev on your terminal, and open http://localhost:3000/ on your browser tab.
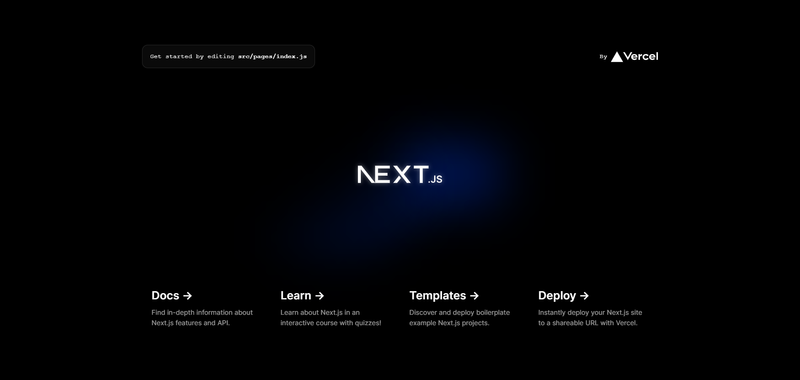
After which you clear all the boilerplate styles and component logic, which leaves you with a blank page.
Installing Strapi
Now that you have Next.js set up, install and configure Strapi to manage your blog content. In your root folder, run:
npx create-strapi-app "your-backend-app-name"and enable the recommended Quickstart configuration.
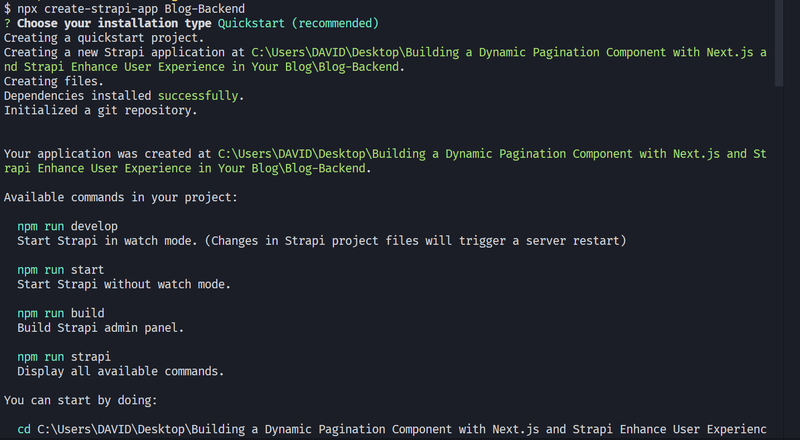
A tab should automatically open in your browser, else go to the http://localhost:1337/admin/ URL.
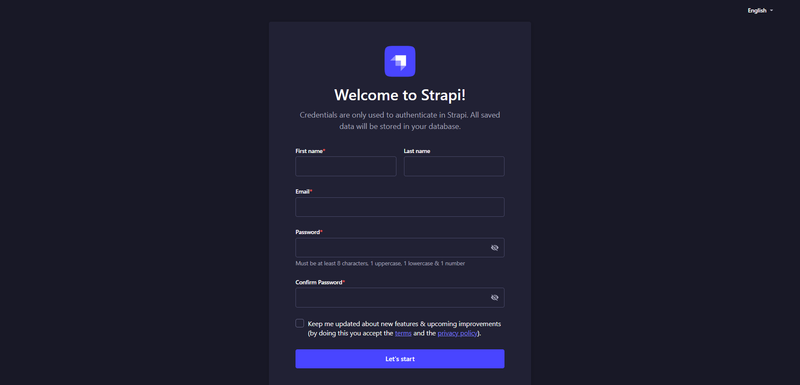
After which you sign up or login.
Configuring your Strapi backend and populating it with data
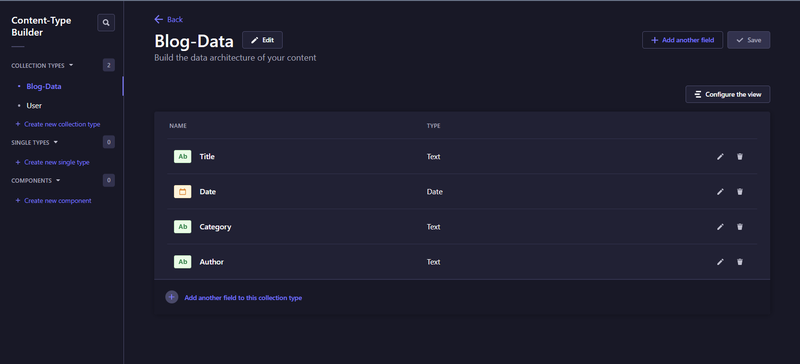
After inputting the required details, navigate the UI and open the Content-Type Builder page. For this article, this pagination component would contain four data fields – article title, date published, category, and author’s username. To create these fields, click on the create new collection type, and fill in the data types accordingly.
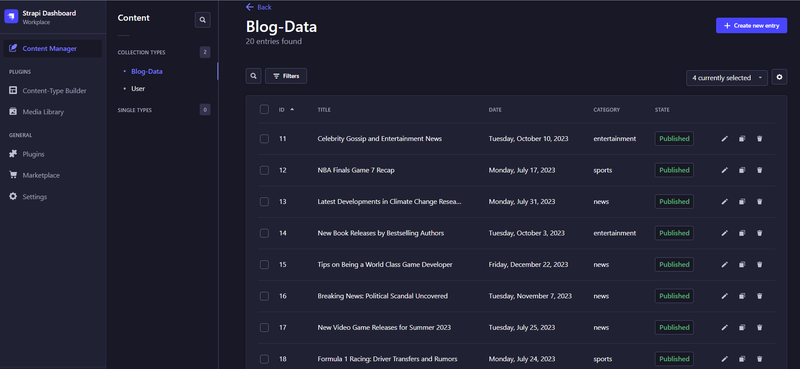
Next, navigate to the Content Manager page and create entries in your collection.
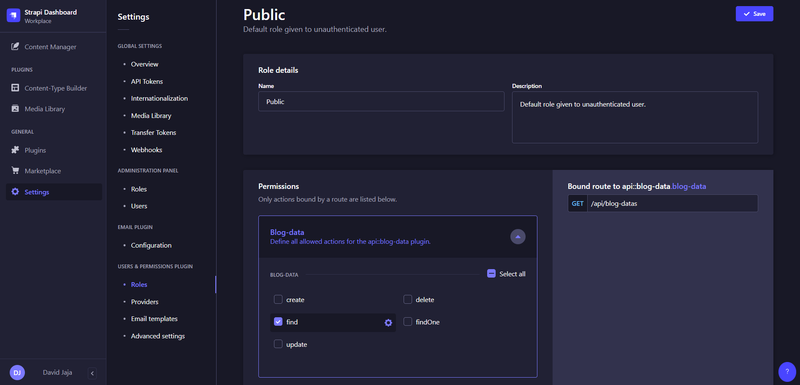
Finally, navigate to settings, roles (Users and Permissions Plugin), public and enable find in your collection. This allows fetching data from this endpoint without getting a forbidden error.
Developing the pagination component
Now that your Strapi backend is set up, let's develop a dynamic pagination component for your blog using Next.js.
Fetching the pagination dataset
First, fetch the data using the getServerSideProps function and pass it to the index page.
export default function Home({ blogs }) {
  console.log(blogs);
  return (
    <div>
      <h1>Home Page</h1>
    </div>
  );
}

export async function getServerSideProps() {
  const res = await fetch(`http://localhost:1337/api/blog-datas`);

  const blogs = await res.json();

  return {
    props: { blogs },
  };
}
Next, create a pagination component which takes in the blogs object, maps over it and renders the data on the interface.
import Pagination from "@/Pagination";

export default function Home({ blogs }) {
  console.log(blogs);
  return (
    <div>
      <h1> Blog Header</h1>
      <Pagination blogs={blogs} />
    </div>
  );
}

export async function getServerSideProps() {
  const res = await fetch(`http://localhost:1337/api/blog-datas`);

  const blogs = await res.json();

  return {
    props: { blogs },
  };
}
import styles from "@/styles/Pagination.module.css";
export default function Pagination({ blogs }) {
return (
<div className={styles.Pagination__container}>
{blogs &&
blogs.data.map((blog) => (
<div className={styles.Pagination__item} key={blog.id}>
<div className={styles.Pagination__details}>
<h2>{blog.attributes.Title}</h2>
<h3>{blog.attributes.Author}</h3>
<div className={styles.Pagination__info}>
<span>{blog.attributes.Date}</span>
<span>{blog.attributes.Category}</span>
</div>
</div>
<button className={styles.read__more}>Read more</button>
</div>
))}
</div>
);
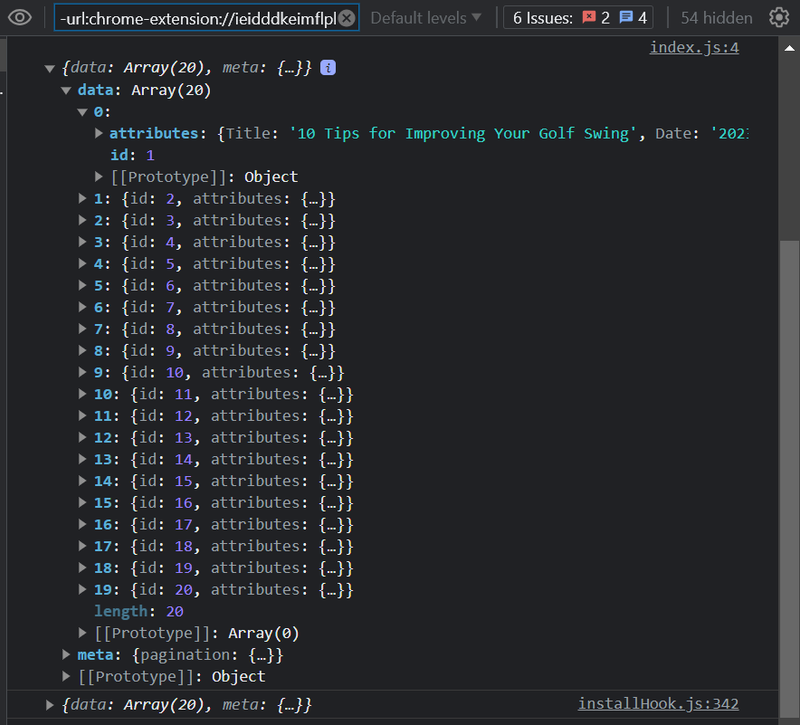
}Taking a look at the console, you can see all the data fetched from our Strapi backend.
Styling the pagination component
To make your pagination component visually appealing, add these styles to your global stylesheet.
@import url("https://fonts.googleapis.com/css2?family=Ysabeau+Infant:wght@400;500;600;700&display=swap");

* {
  margin: 0;
  padding: 0;
  box-sizing: border-box;
}

html {
  font-size: 62.5%;
}

body { font-family: "Ysabeau Infant", sans-serif;
}


h1 {
  margin: 2rem 0;
  text-align: center;
  font-size: 3rem;
  color: #2e4053;
}

button {
  font-size: 2rem;
  font-family: "Ysabeau Infant", sans-serif;
  background: none;
  padding: 1rem 2rem;
  border-radius: 5px;
}

button:hover {
  cursor: pointer;
}
And these to your Pagination stylesheet module.
.Pagination__container {
  background: #d0ece7;
  max-width: 80rem;
  margin: 2rem auto;
  border-radius: 10px;
  padding: 1rem;
}

.Pagination__item {
  display: flex;
  justify-content: space-between;
  align-items: center;
  border-bottom: 1.5px solid #777;
  margin: 0rem 0;
  padding: 1.5rem 3rem;
  color: #212f3c;
}

.Pagination__details {
  display: flex;
  flex-direction: column;
}

.Pagination__item h2 {
  font-size: 2.4rem;
  font-weight: 600;
  line-height: 1.75;
}
.Pagination__details h3 {
  font-size: 1.4rem;
  font-weight: 500;
  text-transform: uppercase;
}

.Pagination__info {
  margin-top: 10px;
  display: flex;
  gap: 5px;
  align-items: center;
  text-transform: capitalize;
  font-size: 1.2rem;
  font-weight: 700;
}

.Pagination__item:last-child {
  border: none;
}

.read__more {
  background: rgba(33, 47, 60, 0.6);
  font-weight: 500;
  color: #fff;
  border: none;
}

.read__more:hover {
  background: rgb(33, 47, 60);
}

.Pagination__controls a {
  font-size: 1.8rem;
  text-decoration: none;
  color: #212f3c;
  display: inline-block;
  border: 1.5px solid #212f3c;
  margin: 1rem;
  font-weight: 500;
  padding: 1rem 1.5rem;
  border-radius: 5px;
}
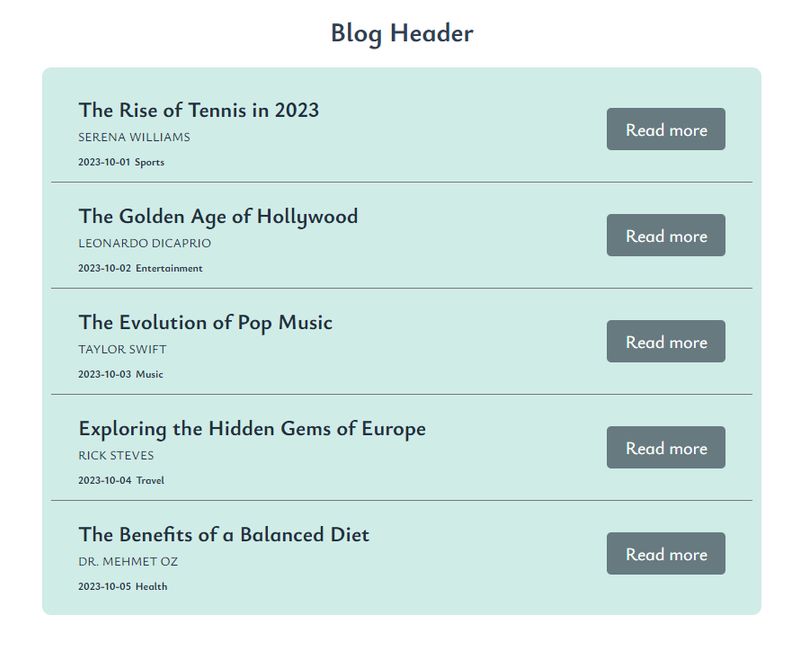
And with that, your pagination component should look like this:
Implementing pagination and routing logic
We can use the page and pageSize properties of Strapi’s Rest API and pass in pagination parameters. These properties determine the page number and the number on each page.
Start by defining a constant variable that states the number of items each page would have.
const PER_PAGE = 5;Then deduce the user’s current page and pass it into the Strapi endpoint:
export async function getServerSideProps({ query: { page = 1 } }) {
  const res = await fetch(
    `http://localhost:1337/api/blog-datas?pagination[page]=${page}&pagination[pageSize]=${PER_PAGE}`
  );

  const blogs = await res.json();

  return {
    props: {
      blogs,
    },
  };
}
The page is initially assigned the value of 1 since it’s the starting page.
Keep in mind that the value obtained from the query params is a string and must be converted to a number for mathematical calculations.
const currentPage = +page;Next, pass in all the useful data and metadata to your pagination component.
import Pagination from "@/Pagination";
const PER_PAGE = 5;
export default function Home({ blogs, currentPage, pagination }) {
  console.log(blogs);
  return (
    <div>
      <h1> Blog Header: {currentPage}</h1>

      <Pagination
        blogs={blogs}
        currentPage={currentPage}
        pagination={pagination}
        perpage={PER_PAGE}
      />
    </div>
  );
}

export async function getServerSideProps({ query: { page = 1 } }) {
  const res = await fetch(
    `http://localhost:1337/api/blog-datas?pagination[page]=${page}&pagination[pageSize]=${PER_PAGE}`
  );

  const blogs = await res.json();
  const currentPage = +page;
  const { meta } = blogs;
  const pagination = { meta };

  return {
    props: {
      blogs,
      currentPage,
      pagination,
    },
  };
}
Taking a look at your component on the browser now reveals the first page of your pagination component.
To properly navigate between pages, you need to create the logic of moving to and from a page.
First, create two links:
<div className={styles.Pagination__controls}>
  <Link className={styles.Pagination__buttons}>⬅ Previous</Link>
  <Link className={styles.Pagination__buttons}>Next ➡</Link>
</div>
Then, dynamically change the href property of the next and previous page buttons to reflect their functionality.
The next page button should increase the page count by 1, and the previous page button should decrease the page count by 1.
import styles from "@/styles/Pagination.module.css";
import Link from "next/link";

export default function Pagination({ blogs, currentPage, pagination , perpage}) {
  return (
    <div className={styles.Pagination__container}>
      {blogs &&
        blogs.data.map((blog) => (
          <div className={styles.Pagination__item} key={blog.id}>
            <div className={styles.Pagination__details}>
              <h2>{blog.attributes.Title}</h2>
              <h3>{blog.attributes.Author}</h3>
              <div className={styles.Pagination__info}>
                <span>{blog.attributes.Date}</span>
                <span>{blog.attributes.Category}</span>
              </div>
            </div>
            <button className={styles.read__more}>Read more</button>
          </div>
        ))}
      <div className={styles.Pagination__controls}>
        <Link
          href={`?page=${currentPage - 1}`}
          className={styles.Pagination__buttons}
        >
          ⬅ Previous
        </Link>

        <Link
          href={`?page=${currentPage + 1}`}
          className={styles.Pagination__buttons}
        >
          Next ➡
        </Link>
      </div>
    </div>
  );
}
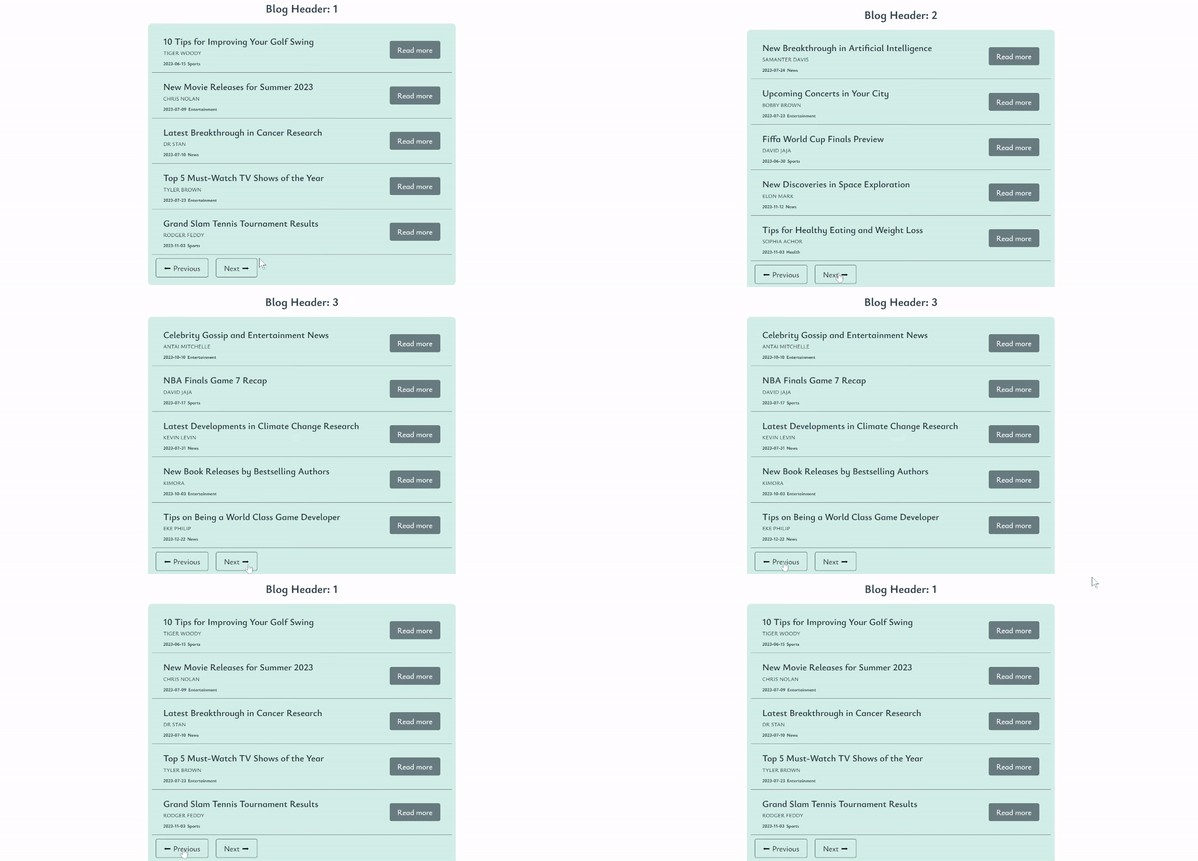
And with that, your pagination works, congrats!
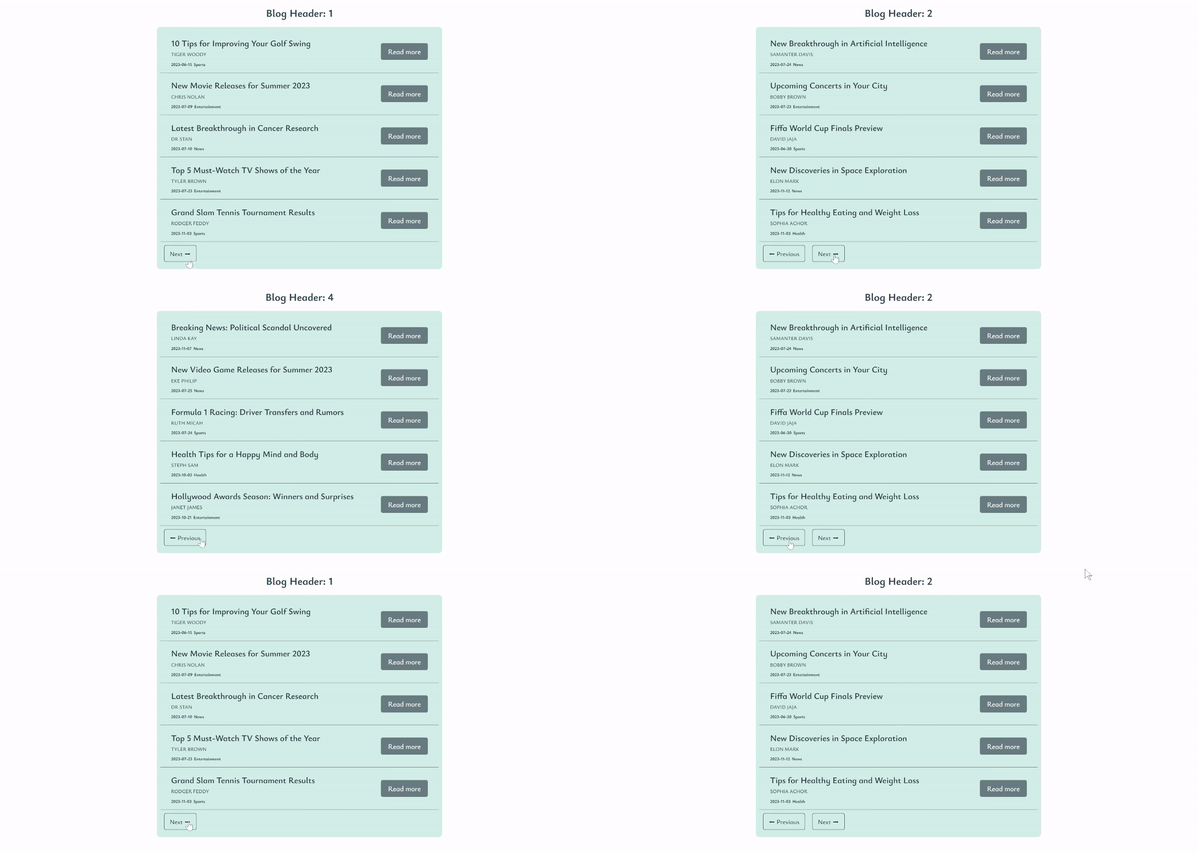
Before you animate the routes, let’s logically render the navigation buttons to only show them when they’re relevant.
To do this, use the pagination prop to check the user’s last page.
const { meta } = pagination;
const lastPage = Math.ceil(meta.pagination.total / perpage);
Then render the buttons accordingly:
export default function Pagination({
  blogs,
  currentPage,
  pagination,
  perpage,
}) {
  const { meta } = pagination;

  const lastPage = Math.ceil(meta.pagination.total / perpage);
  console.log(lastPage);
  return (
    <div className={styles.Pagination__container}>
      {blogs &&
        blogs.data.map((blog) => (
          <div className={styles.Pagination__item} key={blog.id}>
            <div className={styles.Pagination__details}>
              <h2>{blog.attributes.Title}</h2>
              <h3>{blog.attributes.Author}</h3>
              <div className={styles.Pagination__info}>
                <span>{blog.attributes.Date}</span>
                <span>{blog.attributes.Category}</span>
              </div>
            </div>
            <button className={styles.read__more}>Read more</button>
          </div>
        ))}
      <div className={styles.Pagination__controls}>
      //Shows when the user isn’t on page one
        {currentPage > 1 && (
          <Link
            href={`?page=${currentPage - 1}`}
            className={styles.Pagination__buttons}
          >
            ⬅ Previous
          </Link>
        )}
         //Shows when the user isn’t on the last page

        {currentPage < lastPage && (
          <Link
            href={`?page=${currentPage + 1}`}
            className={styles.Pagination__buttons}
          >
            Next ➡
          </Link>
        )}
      </div>
    </div>
  );
}
Enhancing user experience
At the moment, when you navigate between pages, you get a static and rather boring feel while using the component. Let’s change that.
Animating routes for seamless user experience
To animate the routes, we’re using a lightweight animation library called Framer Motion, whose intuitive and easy-to-understand syntax makes animating routes comprehensible.
To begin, open your code editor’s terminal, move into the frontend folder, and install the library:
npm install framer-motionNext, import all the necessary properties from framer motion and create the animation you want to fire when the page changes:
import Pagination from "@/Pagination";
const PER_PAGE = 5;
import { motion } from "framer-motion";

export default function Home({ blogs, currentPage, pagination }) {
  return (
    <div>
     <h1> Blog Header: {currentPage}</h1>
      <motion.div
      //Framer motion animations
        initial="pageInitial"
        animate="pageAnimate"
        exit="pageExit"
        variants={{
          pageInitial: {
            y: "100%",
            opacity: 0,
          },
          pageAnimate: {
            y: 0,
            opacity: 1,
            transition: {
              duration: 0.5,
            },
          },
          //Exit animation, when a page unmounts
          pageExit: {
            y: "100%",
            opacity: 0,
            transition: {
              duration: 0.5,
            },
          },
        }}
      >

      <Pagination
        blogs={blogs}
        currentPage={currentPage}
        pagination={pagination}
        perpage={PER_PAGE}
      />
</motion.div>
    <div/>
  );
}
To trigger this animation every time the page changes, you must first detect those changes with the useRouter hook.
To start, import the useRouter hook, and initialize it.
import Pagination from "@/Pagination";
const PER_PAGE = 5;
import { motion } from "framer-motion";
import { useRouter } from "next/router";

export default function Home({ blogs, currentPage, pagination }) {
  const router = useRouter();
Then pass in the path as a key on the animated element. That way, whenever the page changes the animation reruns.
import Pagination from "@/Pagination";
const PER_PAGE = 5;
import { motion } from "framer-motion";
import { useRouter } from "next/router";

export default function Home({ blogs, currentPage, pagination }) {
  const router = useRouter();

  return (
    <div>
     <h1> Blog Header: {currentPage}</h1>
      <motion.div
       //Key passed in
        key={router.asPath}
        initial="pageInitial"
        animate="pageAnimate"
        exit="pageExit"
        variants={{
          pageInitial: {
            y: "100%",
            opacity: 0,
          },
          pageAnimate: {
            y: 0,
            opacity: 1,
            transition: {
              duration: 0.5,
            },
          },
          pageExit: {
            y: "100%",
            opacity: 0,
            transition: {
              duration: 0.5,
            },
          },
        }}
      >
      <Pagination
        blogs={blogs}
        currentPage={currentPage}
        pagination={pagination}
        perpage={PER_PAGE}
      />
</motion.div>
    <div/>
  );
}
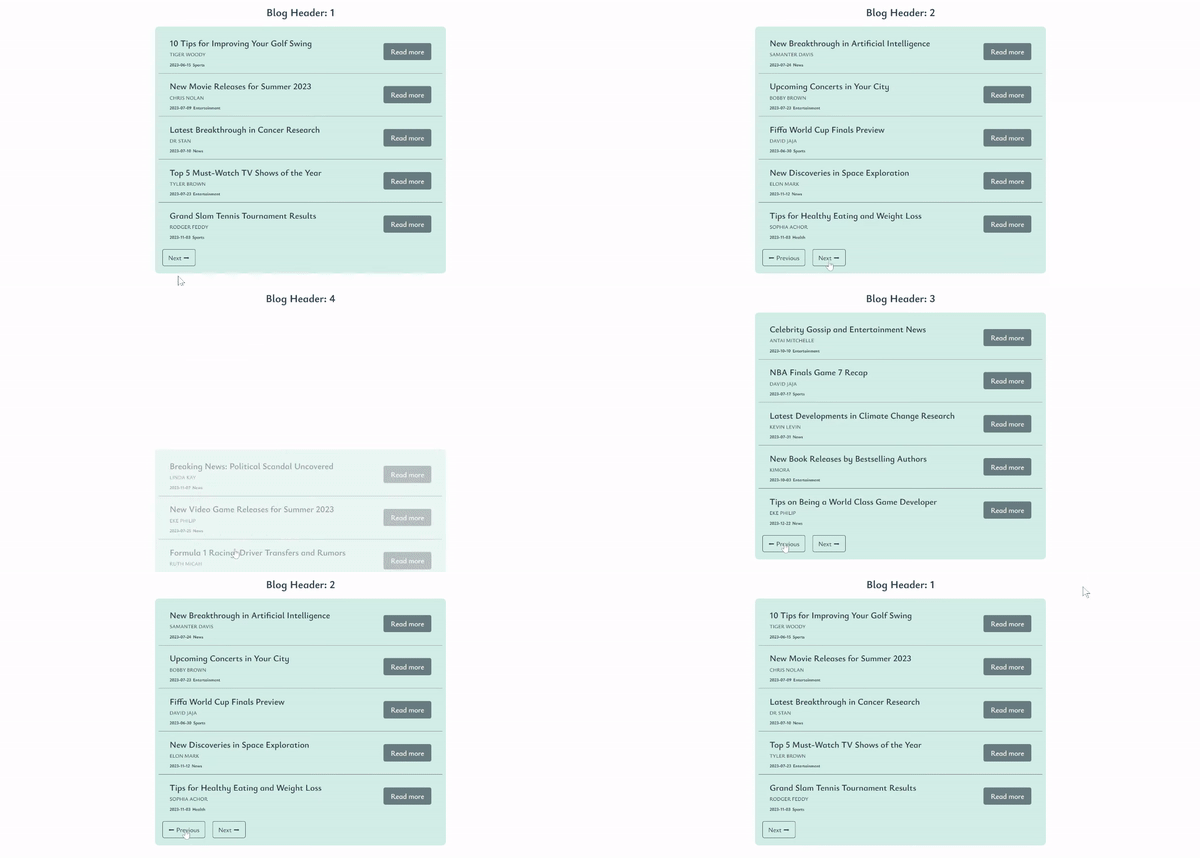
Now testing your finished component:
For ease of accessibility, here’s the final full code:
Home component:
import Pagination from "@/Pagination";
const PER_PAGE = 5;
import { motion } from "framer-motion";
import { useRouter } from "next/router";
export default function Home({ blogs, currentPage, pagination }) {
  const router = useRouter();
  return (
    <div>
      <h1> Blog Header: {currentPage}</h1>

      <motion.div
        key={router.asPath}
        initial="pageInitial"
        animate="pageAnimate"
        exit="pageExit"
        variants={{
          pageInitial: {
            y: "100%",
            opacity: 0,
          },
          pageAnimate: {
            y: 0,
            opacity: 1,
            transition: {
              duration: 0.5,
            },
          },
          pageExit: {
            y: "100%",
            opacity: 0,
            transition: {
              duration: 0.5,
            },
          },
        }}
      >
        <Pagination
          blogs={blogs}
          currentPage={currentPage}
          pagination={pagination}
          perpage={PER_PAGE}
        />
      </motion.div>
    </div>
  );
}

export async function getServerSideProps({ query: { page = 1 } }) {
  const res = await fetch(
    `http://localhost:1337/api/blog-datas?pagination[page]=${page}&pagination[pageSize]=${PER_PAGE}`
  );

  const blogs = await res.json();
  const currentPage = +page;
  const { meta } = blogs;
  const pagination = { meta };

  return {
    props: {
      blogs,
      currentPage,
      pagination,
    },
  };
}
Pagination component:
import styles from "@/styles/Pagination.module.css";
import Link from "next/link";

export default function Pagination({
  blogs,
  currentPage,
  pagination,
  perpage,
}) {
  const { meta } = pagination;
  const lastPage = Math.ceil(meta.pagination.total / perpage);

  return (
    <div className={styles.Pagination__container}>
      <div className={styles.Pagination__items}>
        {blogs &&
          blogs.data.map((blog) => (
            <div className={styles.Pagination__item} key={blog.id}>
              <div className={styles.Pagination__details}>
                <h2>{blog.attributes.Title}</h2>
                <h3>{blog.attributes.Author}</h3>
                <div className={styles.Pagination__info}>
                  <span>{blog.attributes.Date}</span>
                  <span>{blog.attributes.Category}</span>
                </div>
              </div>
              <button className={styles.read__more}>Read more</button>
            </div>
          ))}
      </div>

      <div className={styles.Pagination__controls}>
        {currentPage > 1 && (
          <Link
            className={styles.Pagination__buttons}
            href={`?page=${currentPage - 1}`}
          >
            ⬅ Previous
          </Link>
        )}

        {currentPage < lastPage && (
          <Link
            className={styles.Pagination__buttons}
            href={`?page=${currentPage + 1}`}
          >
            Next ➡
          </Link>
        )}
      </div>
    </div>
  );
}
You can find the project on GitHub and play around with a working demo here on Netlify.
Implementing SEO best practices
When constructing your dynamic pagination component using Next.js and Strapi, it is vital to incorporate SEO best practices to optimize your blog's visibility and organic traffic. Below are some essential strategies to implement for effective results.
Relevant and engaging content
Develop compelling and original content that connects with your intended audience. Construct blog posts that deliver valuable information, address their specific needs, and provide distinctive insights. Engaging content holds the power to attract readers and entice them to spend more time on your website.
Conducting keyword research
Perform comprehensive keyword research to discover pertinent keywords and phrases associated with your blog's topic. Integrate these keywords throughout your content, including in headings, subheadings, and the body of your text. By doing so, search engines can better comprehend the relevance of your content to user queries, enhancing the visibility of your blog.
Enhancing page titles and meta descriptions
Generate captivating and descriptive page titles and meta descriptions for every page on your blog. Ensure these components represent your content and entice users to visit your blog. Incorporate relevant keywords into your titles and meta descriptions while maintaining concise and compelling wording.
SEO-friendly URLs
Optimize your URLs by including relevant keywords and making them clean and readable. Avoid lengthy, complex URLs that contain unnecessary characters or numbers. Clear and concise URLs are favored by search engines.
Utilizing heading tags
Make effective use of header tags (H1, H2, H3, etc.) to organize and structure your content, facilitating search engines' comprehension of the information hierarchy. Embed relevant keywords within your header tags to emphasize the significance and relevance of your content. This practice aids in improving search engine understanding and indexing of your blog's content, enhancing its visibility in search results.
Optimizing images
Optimize your images by employing descriptive filenames and alt tags. By using meaningful filenames and including relevant keywords, you provide valuable context to search engines. Additionally, compress your images to reduce file size without sacrificing quality. This optimization not only improves page loading speed but also enhances the user experience. By implementing these image optimization techniques, you ensure that your blog's images contribute to search engine visibility and user engagement.
By implementing these SEO best practices, your dynamic pagination component will not only enhance user experience but also attract more organic traffic to your blog. Maximizing visibility in search engine rankings will ensure your content reaches a broad audience and drives engagement.
Conclusion
This article is a comprehensive guide to developing a Next.js and Strapi pagination component that enables seamless page navigation.
By implementing the concepts and techniques discussed, you have the power to enhance the user experience of your blog and optimize the presentation of large datasets.
It's now up to you to unleash your creativity and explore the limitless possibilities of using these technologies. May your imagination thrive, and I wish you the best of luck in your programming endeavors. Happy Paginating!