Knowledge Hub
Fine-tuning LLMs for domain specific NLP tasks: techniques and best practices
Introduction
What makes large language models (LLMs) special can be summed up in two keywords - large and general purpose. “Large” refers to the massive datasets they train on and the size of their parameters, which are the memories and knowledge the model learns during training; and “general purpose” means they have broad capacities for language tasks.
More clearly, LLMs are a new type of AI technology behind chatbots like ChatGPT or Bard, and, unlike typical neural nets that are usually trained on one single task, LLMs are trained on the largest dataset possible, like the entire internet, to learn a wide range of language skills for generating text, code and more.
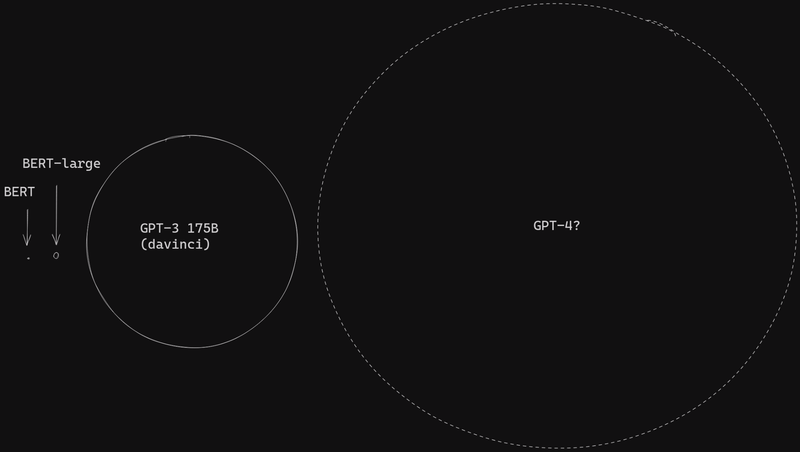
Model sizes
However, their broad, non-specialized foundation means they can fail at niche industry applications.
For example, while an LLM may be skilled at summarizing generic articles with its generalist training, it lacks the specialized medical knowledge to accurately summarize complex surgical procedure documents containing intricate technical details and terminology. This is where fine-tuning comes in — further training the LLM on medical summarization data would teach it the specialized knowledge and vocabulary needed for quality medical summaries.
Curious about how this fine-tuning is done? Well, that’s the focus of this guide. Read on as we dive deeper into techniques to specialize these models!
Training a model on new sets of skills
Large language models lie on the transformer architecture. This structure has dramatically driven advances in natural language processing in recent years. First introduced in the 2017 paper “Attention is All You Need”, the transformer architecture marked a turning point in NLP through its attention-based mechanisms for understanding language context.
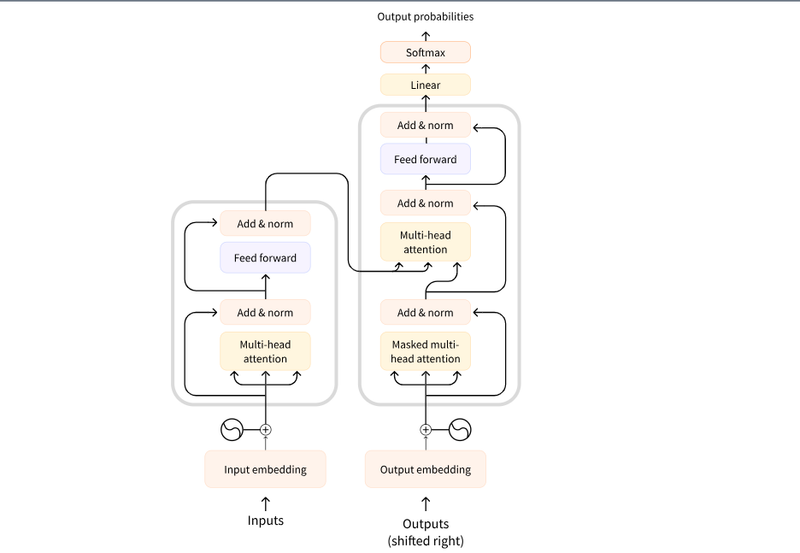
Transformers architecture
At its core, a transformer consists of an encoder and a decoder. The encoder reads in an input sequence, like a sentence, and creates an abstract representation of it. This vector captures the context and meaning behind the words, and the decoder then uses that representation to generate outputs.
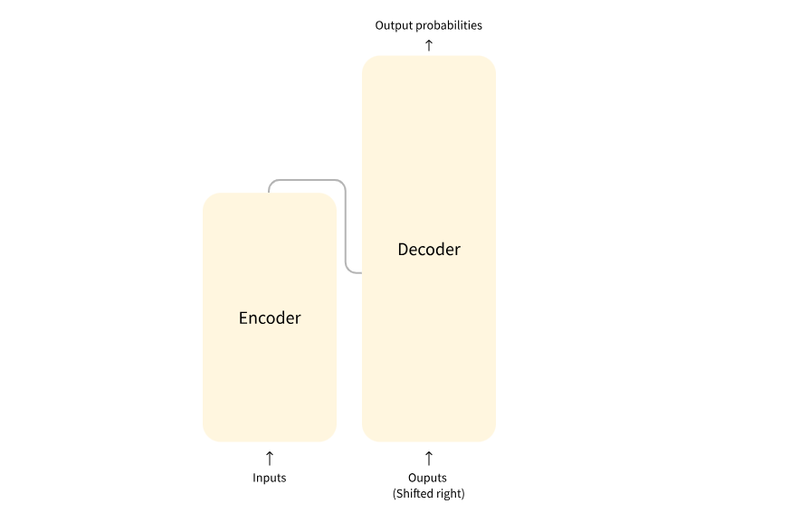
Transformers work through attention mechanisms. This allows the model to focus on the most important words in an input sentence. The model assigns weights and significance to each word based on its context within the phrase or sentence.
Understanding fine-tuning and how it works
Breakthroughs in transformer architectures have enabled the creation of very capable foundation models by training them on huge amounts of text data - including books, websites, and more. Popular examples like T5, Roberta, and GPT-3 build strong general language abilities from exposure to so much information. However, specialized areas require a tuned understanding that broad training misses.
For example, I recently worked on a project building a web app that detects emotion in users’ speech. Identifying feelings like happiness, frustration, or sadness from voice patterns could only be achieved by fine-tuning a pre-trained model on an emotional dataset. You can learn more about applying fine-tuning here.
Bridging this gap from wide to narrow is where fine-tuning helps. Just like continuous learning, fine-tuning enables the enhancement of strengths through the assimilation of new information. By training models with domain-specific data, such as medical journals or customer conversations, their capabilities are elevated to not only match but also excel in those specific areas.
Now let’s explore some techniques you can use to fine tune your LLM.
Fine-tuning techniques
As models are becoming larger, fine-tuning all model parameters can be inefficient, but there are advanced approaches that update just key areas instead while retaining helpful knowledge. Let’s look at some of them:
PEFT
PEFT (Parameter Efficient Fine-Tuning) is a library for efficiently adapting pre-trained language models. It enables adapting large pre-trained language models by updating just a tiny subset of internal parameters rather than all weights. This selectively guides customization, drastically lowering computing and storage needs for fine-tuning.
LoRa
LoRA is a way to fine-tune giant models efficiently by only updating small key parts instead of all the massive internal parameters directly.
It works by adding thin trainable layers inside model architecture that focus training on what needs new knowledge while retaining most existing embedded learnings.
QloRa
QLoRa allows fine-tuning even gigantic models with billions of parameters on consumer GPUs by greatly reducing memory needs.
It works by shrinking model sizes down to tiny 4-bit precision during training. The compressed format significantly reduces computing memory usage, ensuring accuracy is recalculated to full formats when necessary. Moreover, the fine-tuning process focuses exclusively on small adapter layers inserted by LoRA, rather than making direct changes to the entire extensive model.
Fine-tuning in action
Now that we've learned about fine-tuning models, let's get hands-on experience by actually fine-tuning a pre-trained model. For this tutorial, we are going to fine-tune a model for the named entity recognition task in the medical field.
The model to be used here is xlm-roberta-base which is a multilingual version of RoBERTa, and the dataset is ncbi_disease containing disease name and concept annotations of the NCBI disease corpus.
Exciting, right? Let’s go!
Hands-on fine-tuning: code examples
First things first. We need to install three common libraries: transformers, datasets and evaluate. These will allow us access to the models and datasets we will be using for training, and get model performance during training.
##python

# Transformers installation
! pip install -q transformers[torch] datasets
! pip install -q evaluate seqeval
# ! pip install git+https://github.com/huggingface/transformers.git
You can install the library directly from its source on GitHub, providing flexibility in case you want to use the latest developments.
##python

!pip install git+https://github.com/huggingface/transformers.git
Then, load the NCBI Disease dataset specifically for Named Entity Recognition (NER).
##python

from datasets import load_dataset
ncbi = load_dataset('ncbi_disease')
You can also pick other datasets from the hub if you want, just make sure any new dataset works for what you're trying to fine-tune before using it.
Next, we can check the actual named entity recognition (NER) tags used in the test data.
##python

tag_names = wnut["test"].features["ner_tags"].feature.names
tag_names
And this outputs:
['O', 'B-Disease', 'I-Disease']The test data exclusively utilizes three tags: O for out-of-scope words, B-Disease to mark the start of a disease entity, and I-Disease for words that follow and form part of a disease name.
The sequence ['O', 'B-Disease', 'I-Disease'] is a set of labels commonly used in named entity recognition (NER) tasks.
For example, consider the sentence "The patient has been diagnosed with lung cancer". The corresponding labels would be:
"O O O O B-Disease I-Disease I-Disease"
Here, "O" labels words not part of a disease entity, "B-Disease" marks the beginning, and "I-Disease" continues the entity words.
Now, we need to load a tokenizer to preprocess text data.
##python

from transformers import AutoTokenizer
tokenizer = AutoTokenizer.from_pretrained("xlm-roberta-base")
This initializes the xlm-roberta tokenizer using the Transformers library.
The tokenizer formats raw text into ids for the model to understand. This prepares our data for fine-tuning the pre-trained model.
After that, you need to create a function that will prepare your text data for model input. Let's break it down in three parts:
##python

def tokenize_and_align_tags(records):
    # Tokenize the input words. This will break words into subtokens if necessary.
    # For instance, "ChatGPT" might become ["Chat", "##G", "##PT"].
    tokenized_results = tokenizer(records["tokens"], truncation=True, is_split_into_words=True)
    input_tags_list = []
In this part, we use a tokenizer to process input words. It breaks words into smaller parts, ensuring the model can understand them better.
##python

    # Iterate through each set of tags in the records.
    for i, given_tags in enumerate(records["ner_tags"]):
        # Get the word IDs corresponding to each token.
        word_ids = tokenized_results.word_ids(batch_index=i)
        previous_word_id = None
        input_tags = []
Here, we go through the tags in the records. For each set of tags, we figure out which words (or subwords) they correspond to in the tokenized input.
##python

 # For each token, determine which tag it should get.
        for wid in word_ids:
            # If the token does not correspond to any word (e.g., it's a special token), set its tag to -100.
            if wid is None:
                input_tags.append(-100)
            # If the token corresponds to a new word, use the tag for that word.
            elif wid != previous_word_id:
                input_tags.append(given_tags[wid])
            # If the token is a subtoken (i.e., part of a word we've already tagged), set its tag to -100.
            else:
                input_tags.append(-100)
            previous_word_id = wid
        input_tags_list.append(input_tags)
    # Add the assigned tags to the tokenized results.
    # Hagging Face trasformers use 'labels' parameter in a dataset to compute losses.
    tokenized_results["labels"] = input_tags_list

    return tokenized_results
This last part determines the tags for each token. If it's a special token, it gets a specific tag. If it's a new word, it gets the appropriate tag. If it's a subword, it gets another specific tag. Next, add these assigned tags to the tokenized results.
##python

tokenized_nbci = nbci.map(tokenize_and_align_tags, batched=True)
Use the tokenizer to break down the input words in your dataset. This step adds special tokens and might split a single word into smaller parts.
Then you can print out the keys and values:
##python

for key in tokenized_wnut\['train'\][1]:
    print(key, ":", tokenized_wnut\['train'\][1][key])
With that done, you can create a map of the expected tag ids to their tag names with id2label and label2id:
##python

id2label = dict(enumerate(tag_names))
id2label

label2id = dict(zip(id2label.values(), id2label.keys()))
label2id
At this stage you can load your pre-trained model using the Transformers library, providing the number of expected tags and the tag mappings.
##python

from transformers import AutoModelForTokenClassification, TrainingArguments, Trainer
model = AutoModelForTokenClassification.from_pretrained(
    "xlm-roberta-base", num_labels=len(id2label), id2label=id2label, label2id=label2id, ignore_mismatched_sizes=True
)
For training your model, use the Hugging Face Trainer API. It initializes the default training arguments:
##python


Copy code
training_args = TrainingArguments(
    output_dir="my_finetuned_nbci_model",
)
Then train your model:
##python

trainer = Trainer(
    model=model,
    args=training_args,
    train_dataset=tokenized_wnut["train"],
    eval_dataset=tokenized_wnut["test"],
    tokenizer=tokenizer,
    data_collator=data_collator,
)
trainer.train()
At this point, you could push the model to the Hub with the default training arguments. However, let's first do some inference, and after that you can customize the training arguments more specifically for your data.
##python

= nbci\['ttextest'\][1]['tokens']
text
Call your model with the pipeline function and classify the text:
##python

from transformers import pipeline
model = AutoModelForTokenClassification.from_pretrained("my_finetuned_nbci_model/nbci_model")
tokenizer = AutoTokenizer.from_pretrained("my_finetuned_nbci_model/nbci_model")
classifier = pipeline("ner", model=model, tokenizer=tokenizer)

classifier(" ".join(text))
Alright, since the Trainer does not automatically evaluate model performance during training, we need to pass it a function to calculate and display metrics, and the hugging face evaluate library is here to help, it simply provides accuracy function you can load with evaluate.load().
First, import the library:
##python

import evaluate
seqeval = evaluate.load("seqeval")
Then, create your evaluation function that uses it:
##python

def compute_metrics(p):
    # p is the results containing a list of predictions and a list of labels
    # Unpack the predictions and true labels from the input tuple 'p'.
    predictions_list, labels_list = p
    # Convert the raw prediction scores into tag indices by selecting the tag with the highest score for each token.
    predictions_list = np.argmax(predictions_list, axis=2)
    # Filter out the '-100' labels that were used to ignore certain tokens (like sub-tokens or special tokens).
    # Convert the numeric tags in 'predictions' and 'labels' back to their string representation using 'tag_names'.
    # Only consider tokens that have tags different from '-100'.
    true_predictions = [
        [tag_names[p] for (p, l) in zip(predictions, labels) if l != -100]
        for predictions, labels in zip(predictions_list, labels_list)
    ]
    true_tags = [
        [tag_names[l] for (p, l) in zip(predictions, labels) if l != -100]
        for predictions, labels in zip(predictions_list, labels_list)
    ]
    # Evaluate the predictions using the 'seqeval' library, which is commonly used for sequence labeling tasks like NER.
    # This provides metrics like precision, recall, and F1 score for sequence labeling tasks.
    results = seqeval.compute(predictions=true_predictions, references=true_tags)
    # Return the evaluated metrics as a dictionary.
    return {
        "precision": results["overall_precision"],
        "recall": results["overall_recall"],
        "f1": results["overall_f1"],
        "accuracy": results["overall_accuracy"],
    }
Great, you can now define the training arguments for your model. But first, log in to the Hub so you can upload the model later:
##python

from huggingface_hub import notebook_login
notebook_login()
You can access the tokens in your account, just ensure it has “write” access.
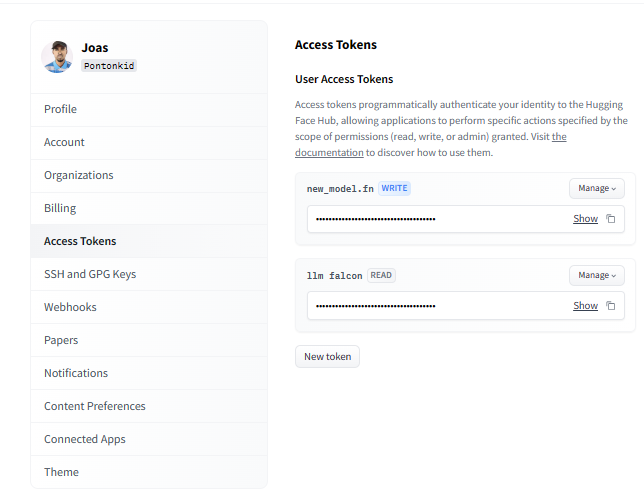
Then, specify the training hyperparameters:
##python

training_args = TrainingArguments(
    output_dir="my_finetuned_nbci_model",
    learning_rate=2e-5,
    per_device_train_batch_size=16,
    per_device_eval_batch_size=16,
    num_train_epochs=4,
    weight_decay=0.01,
    evaluation_strategy="epoch",
    save_strategy="epoch",
    load_best_model_at_end=True,
    push_to_hub=True,
)
Time to train the model using these computed metrics.
First, reload the original xlm-roberta model and tokenizer:
##python

model = AutoModelForTokenClassification.from_pretrained(
    "xlm-roberta-base", num_labels=len(id2label), id2label=id2label, label2id=label2id, ignore_mismatched_sizes=True
)
tokenizer = AutoTokenizer.from_pretrained("xlm-roberta-base")
Next, fine-tune it using your accuracy metrics and specific TrainingArguments:
##python

import numpy as np
trainer = Trainer(
    model=model,
    args=training_args,
    train_dataset=tokenized_nbci["train"],
    eval_dataset=tokenized_nbci["test"],
    tokenizer=tokenizer,
    data_collator=data_collator,
    compute_metrics=compute_metrics,
)
trainer.train()
Voila! Once done, you can push the model to the Hub:
trainer.push_to_hub()Great work! You have now successfully fine-tuned the pre-trained model on the NCBI disease dataset using custom training arguments and metrics.
Tools for fine-tuning LLMs
Whew, that was an epic walkthrough! But fine-tuning your own language models is now easier with tools that minimize coding or use completely visual interfaces.
Let's check out some options that anyone can use to fine-tune models:
Lamini
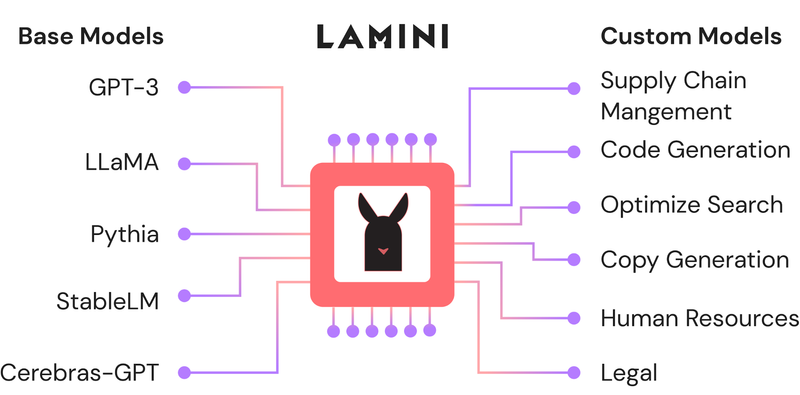
Source: Lamini
Cohere fine-tuning suite
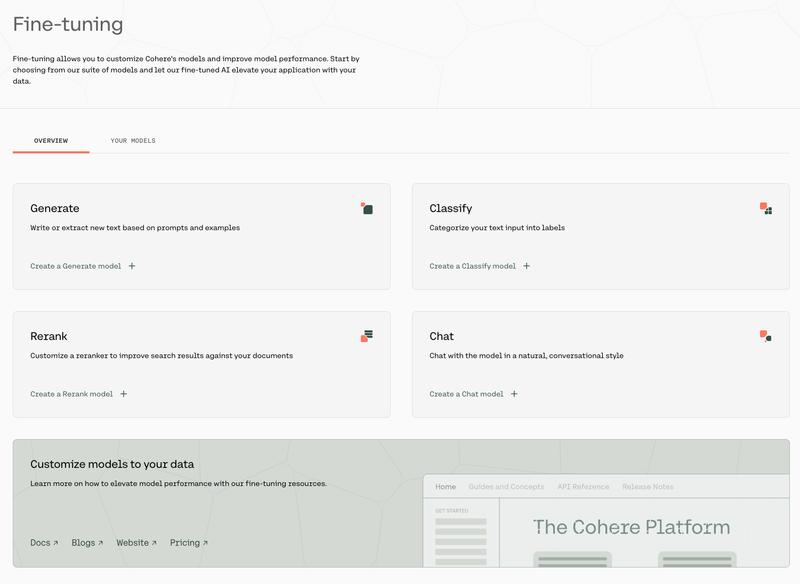
Source: Cohere
First, Cohere is an NLP platform that provides developers access to prebuilt large language models for natural language tasks like text summarization, generation and classification.
Cohere now allows easily customizing models with new fine-tuning options like:
- Chat specialization - personalized, context-aware conversational abilities
- Search/recommendation expertise - precisely matching user preferences
- Multi-label classification - efficiently tagging content across multiple attributes
and they enable specialized training both through fine-tuning web UI or Python SDK options.
Autotrain
HuggingFace offers more than model access, sharing and training libraries. They also provide AutoTrain for no-code fine-tuning.
It enables visually customizing state-of-the-art models on your data without programming. It handles uploading datasets, training, evaluating and deploying tailored creations through an end-to-end platform.
Galileo LLM Studio
Galileo helps develop language LLM applications offering modules spanning the project lifecycle - from prototype experimentation to production monitoring.
The Fine-Tune module focuses on maximizing model customization quality by automatically flagging problematic training data. This allows collaboratively identifying and addressing issues like incorrect labels, sparse coverage, or low-quality examples polluting specialized capability potential. You can learn more about it here.
Of course, many other fine-tuning tools exist beyond Lamini, Cohere, or AutoTrain covered here. But these options help you get started, and feel free to add the ones you know to the list.
Best practices for effective fine-tuning
When fine-tuning large language models, following some best practices helps ensure desired results.
These guidelines cover steps like:
Define your objectives and tasks
You may start by precisely defining the tasks you want your model to excel at - like language translation, text classification, or summarization. Then narrow down the specifics within those broader objectives. For instance, sentiment analysis could involve product reviews, healthcare reports, legal documents, and more - each requiring slight tuning.
Choosing the right model
Choose pre-trained models aligning capabilities with your defined objectives. You can head over to model hubs like HuggingFace or Kaggle to get started, then investigate architecture fundamentals, training data, and more regarding candidates.
Model selection also depends on your hardware resources since, despite efficiency techniques, larger models still require serious hardware.
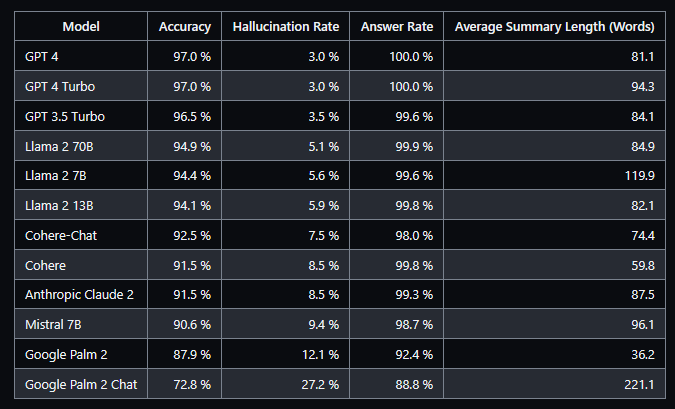
Hallucination leaderboard by Vectara
If you are planning to fine-tune models for text generation or question answering tasks, you can check the model hallucination leaderboard by Vectara or use their model.
Curating high quality training data
When getting data to fine-tune models, quality and relevance are hugely important. Models learn from the exact training examples we give them, so you must feed representative, accurate, clean examples reflecting real-world needs.
Helpful techniques include tokenization - splitting sentences into neatly standardized word groupings, and lemmatization. The data handling process ensures seamless ingestion and learning.
Monitoring and observability
Before the whole monitoring process, to achieve success, it is important to tune factors such as learning rate, batch size, and epochs during the training process. It is necessary before you start checking for biases in your model.
Once you have trained your model, you can use tools such as:
- Giskard to detect problems like hallucinations or factual inaccuracies embedded in the models. Addressing these issues is crucial as they can pose significant risks when the models are deployed to production.
- Superwise or Langkit for large language model monitoring.
Conclusion
And there you have it – you've fine-tuned your model! Kudos on reaching this milestone. Now, consider taking it to the next level by creating a user-friendly app with Gradio or Streamlit. These frameworks make app development a breeze, but there are plenty of options to explore.
You might also want to keep your eyes on new techniques for fine-tuning LLMs. A great start could be checking out the "Language Models are Super Mario" paper, all about combining knowledge from expert models.