- 10 min to read
The best state management libraries for React
React is the go-to for web apps, but state management's a challenge. Let's explore Recoil, SWR, and Formik to boost your skills and learn their key features and how to implement them.


According to a survey conducted by stackoverflow in 2023, React.js dominates as the second most preferred JavaScript technology ranking ahead of Vue.js and Angular. This is largely due to its extensive tooling, active ecosystem, and unmatched flexibility.
Backed by a component-based architecture and virtual DOM implementation, it has continued to excel at building modern and dynamic web applications. React.js remains a framework of choice among software developers, powering numerous websites seamlessly.
Despite its numerous advantages, one of the biggest challenges In working with React is efficient state management. In React, state management involves storing and modifying application data in a central hub, making it easier to share data across components. While this is easy to implement in small applications, it becomes increasingly difficult in bigger applications with numerous components sharing and modifying data.
The React community provides several tools to help developers manage state. However, the rapidly evolving ecosystem presents a challenge for beginners, making it hard even for seasoned developers to choose the best state management tools for a given React project. The aim of this article is to offer insights on the best state managers in React, it’s purpose is to help you enhance your skills and boost productivity
Recoil
What is Recoil.js?
Recoil.js is a state management library developed and open-sourced by Facebook. It offers distinct advantages over several other state management libraries like Redux, MobX, Zustand, etc.
The primary advantages of Recoil are:
- Simplified API integration: incorporating the Recoil library into your React project is very easy, as it does not require the complex setup seen in other state management tools. Once installed, you can start using it right away.
- Hook-based approach: Recoil is designed to use a 100% hook-based approach to manage states. It means you can easily manage your entire state within Function Components using hooks provided by the Recoil library as opposed to
this.stateandthis.setStateused in traditional state managers. - flexibility: Recoil.js can easily adapt to various state management needs and complexities in your React projects. A demonstration of this is seen in its component isolation feature which allows you to isolate state management within specific components or share states across components as needed. This feature makes it suitable for both small and large-scale React applications
- Robust debugging support: debugging your React application becomes easier with the Recoil DevTools extension. Not only does it provide a visual representation of your application’s dependency tree, it also allows you to take snapshots of your application’s state at any point during development. It helps you understand how the components within your React application link and interact with each other. The Recoil library also provides detailed error messages that help you identify errors and debug your code faster with added efficiency.
- Seamless compatibility with existing projects: the Recoil JavaScript library is designed to easily integrate with the existing React projects, eliminating the need for extensive code modification and refactoring. Through its support for gradual adoption, you can start by using Recoil in specific components of your application where you need advanced state management features and gradually adopt it in other components as the need arises.
Installing the Recoil library
To use Recoil in your projects, start by installing the Recoil library in your project using npm or Yarn.
Wrapping your application with RecoilRoot component
One of the fundamental steps in incorporating Recoil.js into your React project is wrapping your entire application with the <RecoilRoot> component provided by the Recoil library. It provides a central hub where your application’s state will be managed.
Below is a code illustration:
In this example, you import RecoilRoot from recoil and wrap your application’s root component within it. Doing this establishes RecoilRoot as a provider from which all components can access and modify states.
Key features of Recoil.js
Recoil has two key features that contribute to its effectiveness in state management. These are Atoms and Selectors.
Atoms
An atom in Recoil.js is a shareable piece of state that React components can read from and write to. Subscribed components within your project can access and modify state values in an atom. Also, when an atom is modified, each subscribed component is re-rendered with the new value.
Below is an illustration of an atom definition in Recoil:
The code block above shows how you can use Recoil atoms. It defines an atom called counter using the atom property provided by Recoil. The atom has a unique identifier and its default value set to 0. Exporting an atom makes it accessible to subscribed components to consume and modify.
After defining an atom, it can be accessed within subscribed components. This is illustrated in the code block below:
The code block above shows the consumption of an atom within a subscribed component. It starts by importing the useRecoilValue hook from Recoil. The CounterComponent uses this hook to retrieve the current value of the counter atom. It then renders the value of count in an h1 element.
Selectors
Recoil.js also provides selectors, which are pure JavaScript functions that enable developers to transform or mutate states synchronously or asynchronously based on the existing state data. These selectors provide a powerful mechanism to manipulate the states and transform data within React applications.
One use case where Recoil selectors particularly shine is in React components that require constant updates, for example, in a shopping cart component.
Let’s assume you are defining a Recoil atom called cartItems that stores an array of items added to the shopping cart. Each item in the cart has properties, e.g: id, price, and quantity.
You can easily define a Recoil selector called totalPriceSelector that calculates the total price of all the items in the cart based on the quantity and price properties.
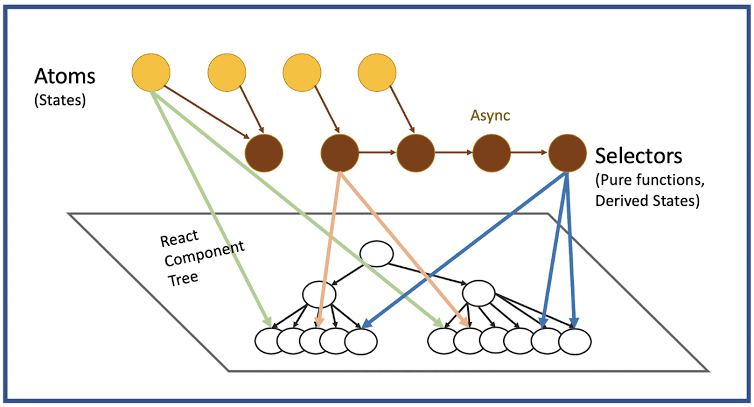
Figure: Recoil data visualization by Jennifer Fu
The image above illustrates how atoms and selectors are linked in Recoil. This interconnection between atoms and selectors allows the modification of states set in atoms by selectors linked to React components
Here's an illustration:
The code block above illustrates the use of Recoil selectors to easily modify a derived state: totalPrice, based on the current state of the cart items. It shows a seamless and reactive approach to managing complex state modifications in the sample shopping cart component.
SWR (Stale-While-Revalidate)
What is SWR?
SWR is a library for asynchronous development, which adopts a Stale-While-Revalidate technique, that serves the user-cached data while concurrently sending a refresh/revalidate request in the background to obtain updated data.
Over time there have been contemplations among developers about the most effective approach to data retrieval, especially the ways to prevent excessive database queries and also eliminate the wait time required to load asynchronous data.
With SWR, you can make asynchronous tasks smoother and easier — it brings some optimizations in performance by minimizing network requests and giving users a smooth experience with the display of some pre-fetched data while making requests for the latest data in the background.
SWR is easy and very flexible to use for handling complex data fetching with React.
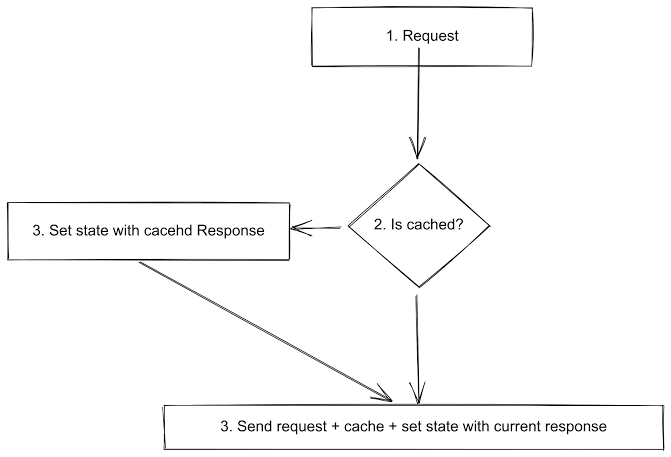
Figure: SWR flow chart by Jacob Cofman
The image above is a flowchart illustrating how SWR works behind the scenes. When a GET request is made to the database, SWR checks if a similar request has been made before and if the data has been cached. If the data is found in memory, it serves the user the existing data while simultaneously sending a request for an updated data in the background, else It sends a new request to get the data, cache the data and serve the data to the user.
Installing the SWR library
To use SWR in your React projects, start by installing the SWR library using npm or Yarn.
The code above installs SWR as a dependency in your React project.
You can then start fetching and managing data in your components by importing the useSWR from SWR as shown in the code below:
Key features of SWR
- Stale-While-Revalidate strategy: SWR serves cached data to the user while simultaneously initiating a request to revalidate the data in the background. It helps to reduce the time taken to serve data.
- Automatic caching: SWR ships with a built-in caching mechanism that automatically stores fetched data. It allows subsequent requests for the same data to be served from the cache.
- Automatic revalidation: SWR is designed to automatically revalidate stale data based on several conditions set by you. These conditions include:
OnFocus,OnMount,onHover, etc. - useSWR hook: this hook is the primary hub to use SWR in React. It takes a configuration object and returns another object with the
data,error, andisValidatingkeys. - Dependency tracking: SWR tracks the dependencies of data fetching functions within your components and automatically revalidates data when the dependent variables change, thus eliminating the need for the traditional React
useEffecthook.
How to implement SWR in React apps
Below is an example of SWR implementation in a simple React component:
The code block above illustrates the use of the useSWR hook provided by SWR in a MyDataHandler component. It starts by importing dependencies and defining a function called fetchData to fetch data from the provided URL.
Inside the MyDataHandler component, the useSWR hook is used to handle asynchronous data fetching. It requires configuration parameters and returns two variables: data and error.
While the data is being fetched, a loading indicator is shown. Once the data is successfully fetched, it is rendered in a ‘h1' element. If an error occurs during the data fetching process, an error message is shown instead.
Formik
What is Formik?
Integration of highly responsive forms has become an integral part of software development, this is especially due to the large emphasis on user interaction and data collection in modern applications. Formik is a highly customizable and efficient form management library that simplifies the process of building and managing highly responsive forms.
Its simplicity, built-in state management, Smaller file size, and Integration with the React ecosystem are among the reasons why Formik is a preferred choice for many developers. One of its unique features is the Field Array functionality, which allows developers to add and remove form fields dynamically based on user interactions.
Installing the Formik library
To use Formik in your React projects, start by installing the Formik library in your project using npm or Yarn.
Key features of Formik
- Built-in state management: Formik ships with a built-in state management feature. It eliminates the need for a third-party library to manage the state within your form component.
- Data validation and error handling: Formik provides data validation and error handling features that optimize data handling and code debugging.
- Field array: Field array is a Formik feature that allows developers to manage an array of form fields. It enables dynamic manipulation of form fields, i.e. dynamic addition or removal of fields.
- Fast field: this feature prevents unnecessary re-renders of form fields that have not been modified. The implementation of fast fields in Formik helps to improve the performance of large forms with many fields.
How to implement Formik in React apps
Below is a simple implementation of Formik in a basic React form component:
The code above illustrates the implementation of a responsive form using Formik.
The MyForm component defines the initial form values and implements form validation logic using a validateForm function. The form submission is handled by the handleSubmit function.
The form structure is encoded in the return statement. The form fields are defined using the Field component. Error messages are also rendered using the ErrorMessage component provided by Formik.
Upon submission in this illustration, the form values are logged to the console, and the form resets by calling the resetForm function.
Yup - a form validation library
Yup is a JavaScript library used for form data and schema validation. It is commonly used in conjunction with Formik as a tool to define and enforce form validation rules. For example, it is used to ensure that a user enters the correct email or the password entered contains the required characters. It can also perform more advanced data validation functions such as Asynchronous Validation, Custom Validation, Array Validation, etc.
Implementing form validation with Yup and Formik
You can install these libraries using the following command:
The code block below illustrates the incorporation of the Yup library with Formik for form validation in a React application.
In the MyForm component above, Formik is initialized with the useFormik function which takes an object configuration. The initialValues property defines the initial values of the form fields, which include "name," "email," and "password."
The validationSchema uses Yup schema objects to specify the validation rules for each field. For example, it ensures that the "name" field must contain a non-empty string and renders an error message ('Name is required') when it is left empty. Likewise, the "email" field is required to contain a valid email address format, and the "password" field must be at least 6 characters long, each rendering error messages if these validation rules are not met.
The onSubmit property defines a function that receives the form values and logs them to the console on submission.
The return statement contains the form structure. Here, Formik is used to manage the state of the input fields. Error messages are also selectively displayed when a field has been edited and contains validation errors.
In conclusion, this code shows a powerful way to validate forms using Formik and Yup by defining validation rules and error-handling mechanisms.
To learn more about the Yup library, check out the documentation.
Conclusion
This article explored three powerful React.js tools: Recoil for general state management, SWR for data fetching, and Formik for reactive forms.
Utilizing these tools, you can enhance your React.js skills and stay ahead in the React ecosystem. For more on these tools, check out: Recoil.js Docs, SWR Docs, and Formik Docs.
That’s all for now, folks. Keep coding, keep learning, and embrace the Code-Eat-Sleep-Repeat mantra for continuous growth. Happy coding!