Knowledge Hub
Supabase
Supabase Review and Features
Written by Melvin Kosisochukwu
Last update: 6/7/2024
| Feature | Supabase | |
|---|---|---|
Infrastructure, Underlying technology Cloud Infrastructure, database system and underlying egine | Supabase infrastructure, PostgreSQL, S3 compatible storage object | |
Serverless Support Serverless and Edge computing support | ||
API | Deno Edge Function | |
Edge Functions Serverless functions that run closer to the user, reducing latency and improving performance. | Supabase infrastructure | |
Developer Experience | ||
Database type | OLTP | |
Data model Databases store data in models, such as Relational, Columnar or Document based | Relational, SQL | |
CLI Command Line Interface tools that allow developers to perform tasks and manage the tool via the command line. | supabase | |
Languages, APIs The languages supporting the database and API interface for inter-process communication | TypeScript, JavaScript, supabase-js SDK, Flutter, React Native, React | |
Query language Supported query language such as SQL, MQL, PartiQL, | SQL, PostgreSQL | |
ACID compliant ACID is a set of properties of database transactions intended to guarantee data validity despite errors, power failures, and other mishaps | ACID compliant | |
Self-hosting Support for self-hosted Database instance | Docker support | |
Backups | Daily basis (Included in Free tier), PITR for paid users | |
Security & Compliance Offerings | ||
SOC2 Service Organization Control 2 compliance for managing customer data. | ||
Multi-factor authentication Support of the cloud-histed database for multi-factor authentication | ||
Encryption Cryptographic security at rest and on transportation level | AES 256 Encryption, TLS v1.2 | |
SSO | ||
Monitoring and analytics | ||
Log retention Query log retention usually keeps lofs of operations for debugging and replication purposes | By default disabled, can be enabled with pgAudit extension | |
Statistics Tools and APIs for analysing and monitoring of Database performance | Web dashboard, provides Prometheus-compatible metrics endpoints to gather health insights | |
Scalability | ||
Replication and Partitioning | read replicas in early preview | |
Serverless development is the new wave of backend development due to the ease of setup and reduced complexity in building applications. This switch in development has resulted in the spawn of serverless service providers offering serverless database integrations for applications. One of these providers is Supabase.
What is Supabase?
Supabase is a serverless backend service provider and an open-source Firebase alternative. It allows you to build highly optimized and performant applications using Postgres backend with little configuration. As a serverless database, it will enable you to set up your backend without the need to build a custom server. In addition, Supabase is a SQL (Structured Query Language) alternative to Firebase, providing all the feature-rich benefits that SQL databases provide over NoSQL.
Supabase features
Supabase provides developers with many features to ease the development process, allowing you to focus more on your applications' logic and core process. These features include but are not limited to:
Authentication
Supabase comes with a prebuilt authentication/user management system handled by the package with no need for third-party tools. The authentication feature allows you to verify your users and create access restrictions for your application. The authentication system offered includes a magic link, email, phone, Single-Sign-On (SSO), and a range of social auths (Facebook, Google, Twitter, Slack, GitHub, etc.).
To simplify the authentication process further, Supabase provides a prebuilt Authentication UI component for React and additional helpers for frameworks like Next.js, Remix, and SvelteKit.
Supabase also provides extended authentication functionalities, allowing additional flexibility and customization for developers, such as:
- Email template customization
- Multi-factor authentication
- Captcha protection
Database
Supabase projects come prebuilt with a Postgres database, allowing you to use all the features that Postgres provides. These features can be extended by adding extensions to your database at the click of a button. The user-friendly table GUI (Graphic User Interface) for tables created on your database makes it easy for anyone to preview tables on Supabase, making it beginner friendly.
Additionally, database functionalities are simplified, allowing you to clone a table quickly, create table relationships, and run your queries with the SQL Editor while removing the complexity of database backup since this is handled automatically by Supabase. It also allows you to import data directly to your table using CSV or Excel spreadsheets.
Realtime database
Real-time updates and seamless data synchronization are crucial for creating engaging and interactive applications. Supabase Realtime allows you to integrate real-time updates to your application. For example, you can enable Postgres Changes for your database to get real-time updates on CRUD operations performed on your database. You can also send messages to multiple clients using the Broadcast feature of Realtime.
The Realtime feature makes it easy to build applications requiring real-time updates, track user presence and online status, and track message latency.
Storage
Supabase allows you to store and serve large files directly from the platform allowing you to have a central application and eliminating the need to integrate additional tools like AWS S3 Buckets for storage. The storage system will enable you to store files on your database, but it is always advised not to store large files directly. Supabase also provides a feature that addresses this by providing storage buckets, i.e., dedicated folders that store files.
Edge functions
These are functions deployed globally "at the edge of the internet" that listen for webhook and allow you to integrate your Supabase project with third-party applications. The edge functions deployed include integrating Stripe, Telegram bots, Open AI, etc. You can find an example of Supabase edge functions in the GitHub Repository.
Benefits of using Supabase
We have reviewed some of the features offered by developing applications using Supabase and have noted some of the benefits they provide from development experience through the efficiency of the application. In this section, we will review in-depth some of these benefits.
- Easy setup - Supabase is very easy to set up, with a user-friendly dashboard and GUI for tables. It also provides exhaustive documentation on integrating Supabase with different development environments.
- Rapid development - Supabase allows you to develop your applications without the trouble of building a server from scratch. It improves development speed and allows you to focus on other aspects of your application.
- Automated APIs - Supabase automatically generates APIs based on the database schema, eliminating the need for manual API development. It simplifies creating and managing APIs, saving developers valuable time and effort.
- Authentication and security - Supabase provides a comprehensive authentication system that handles user management for your application, from creating a new user to handling user access and resetting passwords for existing users. Supabase also allows you to integrate social or multi-level authentication, improving the security of your applications.
- Scalability and performance -Supabase leverages PostgreSQL, a highly performant database, to manage traffic and large files and data for your application.
- Inbuilt SQL editor - Supabase provides an inbuilt SQL editor that allows you to run queries on your database directly from your dashboard.
- Support for different development environments - Supabase supports JavaScript and other development environments/languages like Python, C#, Kotlin, Flutter, and Swift.
- Open-source - Supabase is an open-source company, meaning developers can access and customize the source code to their needs.
Supabse pricing
Supabase comes in three pricing plans, FREE, PRO, and ENTERPRISE. Although Supabase allows you to do a lot on the platform for free, pricing is attached to extending the platform to handle production applications. This does not break the bank but might not be affordable to most indie developers. Although you can have a simple production app on the free tier, moving to the Pro level is advisable to improve the scalability, files, and traffic your database can handle. There is no information on the cost of the Enterprise plan on the platform, but the Pro plan comes at $25/month per project plus usage costs. You can find more pricing details on the Supabase pricing page. Finally, ENTERPRISE is a custom plan tailored to the specific needs of large-scale applications. It usually includes priority support and additional customization features.
Supabase vs. Firebase
Firebase by Google is a NoSQL serverless service that allows you to develop applications quickly. From the description of Firebase, we can already see the similarities between Firebase and Supabase, as they both offer serverless services. In this section, we will compare their services and features.
| Feature | Supabase | Firebase |
|---|---|---|
| Database | Supabase uses PostgreSQL as its primary database. This is a table-oriented database. | Firebase uses a NoSQL database called Firestore. This is a document-oriented database. NoSQL databases store data in a key-value pair format. |
| Real-time capabilities | Supabase offers real-time capabilities through WebSocket technology and Postgres Changes to listen to the database for changes, allowing for real-time updates and data synchronization. | Firebase provides data Synchronization and real-time updates using a WebSocket-like technology. Every time data changes, any connected device receives that update within milliseconds. |
| Authentication and User Management | Supabase offers a comprehensive authentication system with social auth, Multi-Level Authentication (MLA), SSO, and magic links. | Firebase also offers comprehensive authentication with the magic link, social auth, SSO, and MLA. |
| Social Auth Providers | Google, Facebook, Apple, Azure (Microsoft), Twitter, GitHub, GitLab, BitBucket, Discord, Keycloak, LinkedIn, Notion, Slack, Spotify, Twitch, WorkOS, and Zoom | Google, Facebook, Play Games, Game Center, Apple, GitHub, Microsoft, Twitter, and Yahoo |
| Serverless Functions | Serverless Edge Function Support | Serverless Cloud Functions |
| Pricing | Supabase offers a Free plan to allow you to practice and deploy small applications with no charge and a Pro plan that costs $25/month with additional usage costs. | Firebase offers a free tier with limited resources and a Pay-as-you-go plan; it means you're charged based on your usage. |
| Maintainers | Supabase is an open source maintained by the community. |
Overall, both services offer similar features that help you quickly build and scale your applications. Supabase has a more user-friendly and easy-to-use dashboard, though.
So far, we have reviewed Supabase and its features. Now it’s time to go through how to integrate it into your application and use some of the features that Supabase offers.
Creating a new project in the Supabase dashboard
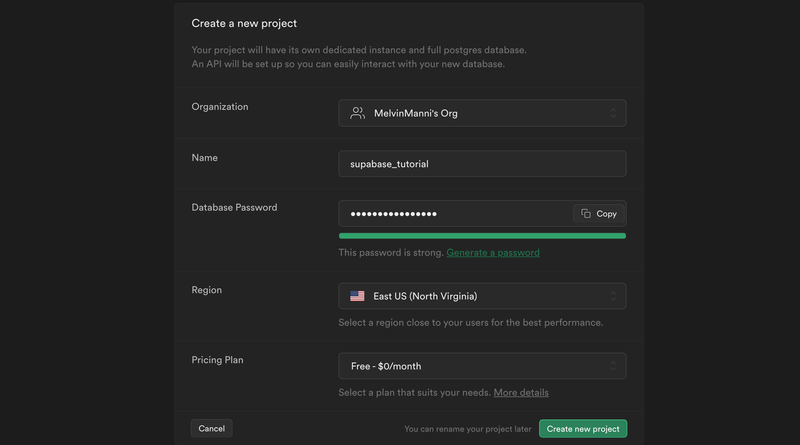
The first step is to visit the Supabase website and create an account. It will give you access to your Supabase dashboard. When you click on the “New project” button, select an organization and complete the project form.

Writing an SQL Query for your project
To write an SQL query for a project, navigate to the project and on the left menu select SQL Editor and new query. Enter the SQL query and click “run”:
--Example SQL query to create a table user_bio
create table user_bio (
  user_id uuid primary key,
  inserted_at timestamp with time zone default timezone('utc'::text, now()) not null,
  updated_at timestamp with time zone default timezone('utc'::text, now()) not null,
  name text,
  age int,
  hair_colour text,
  sex text,
  height text
);
This query will create a new table user_bio for your project with the columns (id, inserted_at, updated_at, data, name, age, hair_colour, sex, height).
Adding Supabase to a React application
In this subsection we will look at how to integrate Supabase to a React application using the Supabase client library. First, create a new react app by running the command on the terminal:
npm create vite@latest supabase_tutorial -- --template reactChange directory to the development folder and install Supabase client library.
cd supabase_tutorial && yarn add @supabase/supabase-jsSet up the application's file structure to look like this. Focus on the Supabase functionalities for this application. I have provided the complete code base in the public GitHub Repository.
src
├── App.css
├── App.jsx
├── App.css
├── App.css
├── main.jsx
├── assets
   └── react.svg
└── assets
   └── supabaseClient.ts
To use the react auth UI from Supabase, add the library to your project. On your terminal, run the command:
yarn add @supabase/auth-ui-react @supabase/auth-ui-sharedThe next step is to set up the Supabase client for the application. In the supabaseClient.ts file under the config folder, create the Supabase client and export it for use across the application.
import { createClient } from "@supabase/supabase-js";

const supabaseClient = createClient(import.meta.env.VITE_SUPABASE_URL!, import.meta.env.VITE_SUPABASE_ANON_KEY!);
export default supabaseClient;
The createCLient function accepts two parameters - your project’s Supabase URL and your anon key. You can find this on your Supabase dashboard for the project under Settings>API:

Handling authentication
To handle the authentication for this project, go to the App.tsx file and import the Auth component for Supabase:
import { useEffect, useState } from "react";
import "./App.css";
import supabaseClient from "./config/supabaseClient";
import { Auth } from "@supabase/auth-ui-react";
import { ThemeSupa } from "@supabase/auth-ui-shared";
function App() {
  const [session, setSession] = useState(null);
  useEffect(() => {
    supabaseClient.auth.getSession().then(({ data: { session } }) => {
      setSession(session);
    });
    console.log(session);
    const {
      data: { subscription },
    } = supabaseClient.auth.onAuthStateChange((_event, session) => {
      setSession(session);
    });
    return () => subscription.unsubscribe();
    // eslint-disable-next-line react-hooks/exhaustive-deps
  }, []);
  if (!session) {
    return <Auth supabaseClient={supabaseClient} appearance={{ theme: ThemeSupa }} />;
  }
}
export default App;
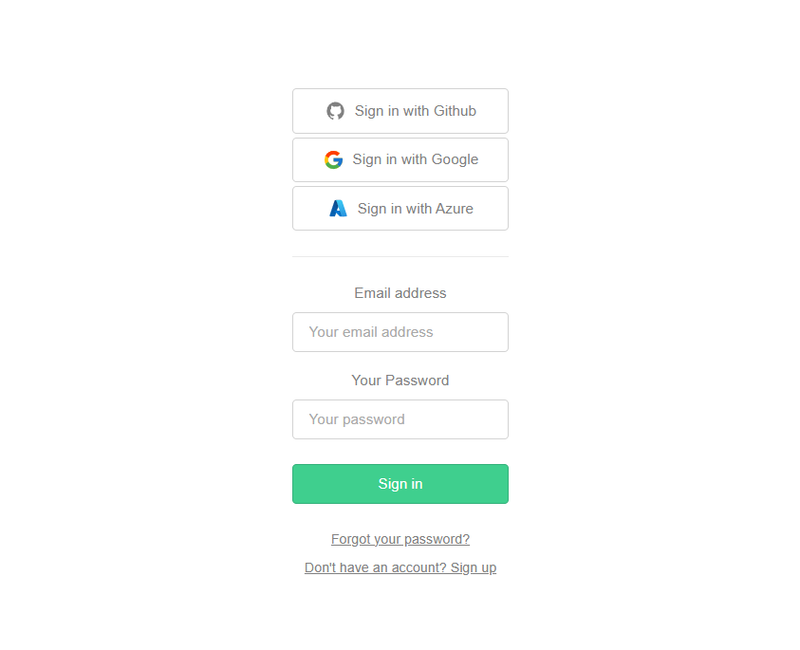
The Auth component will create a prebuilt authentication page for your application completely handled by Supabase.

On your dashboard, enable the social auth providers you want to use. For the purpose of this article, let’s use the GitHub provider. Update the Auth component props:
...
    return <Auth supabaseClient={supabaseClient} appearance={{ theme: ThemeSupa }} providers={["github"]} />;
...
On the Supabase dashboard, click Authentication>Providers and select GitHub from the list. You will be required to enter your Client ID and client secret. You can find an article on how to get these details here. Once enabled, you have the auth page with GitHub as the only available provider. You should have a fully functional auth system for your application in place at this stage.

Next, build the page displayed when a user logs into the application. It will comprise input fields allowing the user to enter their bio (name, age, hair color, height, and sex). Add the ability to update these details or delete them.
To create a new row on our Supabase table, you need to use the supabaseClient and call the from method, which accepts the name of a table you want to act on. The code sample below will either create a new row on a table or update the existing row. The handleSubmit function will trigger either the create query or update query depending on the current value of form.state.
...
  const handleSubmit = async (e) => {
    e.preventDefault();
    setForm({ ...form, loading: true });
    const payload = { ...state};
    payload.age = isNaN(payload.age) ? 0 : parseInt(payload.age);
    if (form.state === "create") {
      const { error } = await supabaseClient.from("user_bio").insert([
        {
          ...payload,
          updated_at: new Date().toISOString(),
          inserted_at: new Date().toISOString(),
          user_id: session.user.id,
        },
      ]);
      if (error) {
        alert(error.message);
      } else {
        alert("Profile created successfully");
      }
    } else {
      payload.updated_at = new Date().toISOString() ;
      payload.inserted_at = undefined;
      const { error } = await supabaseClient.from("user_bio").update(payload).match({ user_id: session.user.id });
      if (error) {
        alert(error.message);
      } else {
        alert("Profile updated successfully");
      }
    }
    setForm({ ...form, loading: false });
    fetchUserBio();
  };
...
In line 8, create a new table with the current user session id set as the row's primary key (id). While in line 24, update a row with an id matching the current session user id and pass the present value of the form fields as payload.
To delete a row, call the delete method and append a filter query. It will delete the row matching the query. For example, the code below in line 5 demonstrates how you can delete a row with an id matching the current session user id:
...
  const resetUserBio = async () => {
    if (session) {
      setForm({ ...form, loading: true });
      const { error } = await supabaseClient.from("user_bio").delete().match({ user_id: session.user.id });
      if (error) {
        alert(error.message);
      } else {
        setState({
          name: "",
          age: "",
          hair_colour: "",
          height: "",
          updated_at: "",
          inserted_at: "",
        });
        setForm({ ...form, state: "create" });
      }
      setForm((prev) => ({ ...prev, loading: false }));
    }
  };
...
To fetch data in your application, call the fetchUserBio function. It calls the select method query on a table. The select method accepts columns that you would like to fetch from the table. You can use the wildcard “*” to return all columns.
...
  const fetchUserBio = async () => {
    if (session) {
      setForm({ ...form, loading: true });
      const { data, error } = await supabaseClient.from("user_bio").select("*").match({ user_id: session.user.id });
      if (error) {
        alert(error.message);
      } else {
        if (data.length) {
          setState(data[0]);
          setForm({ ...form, state: "update" });
        }
      }
      setForm((prev) => ({ ...prev, loading: false }));
    }
  };
...
Ecosystem
Supabase, an open-source library, offers a range of helpful communities that will help you quickly get started or answer questions when you've hit a roadblock. In addition, some third-party libraries and extensions come with the Supabase ecosystem allowing faster development.
The Supabase GitHub repository has a discussions tab where many developers and contributors engage in discussions related to the library. It is a great place to drop questions and get responses from the community. The Supabase Discord server and Twitter also offer a platform to engage with other developers within the ecosystem.
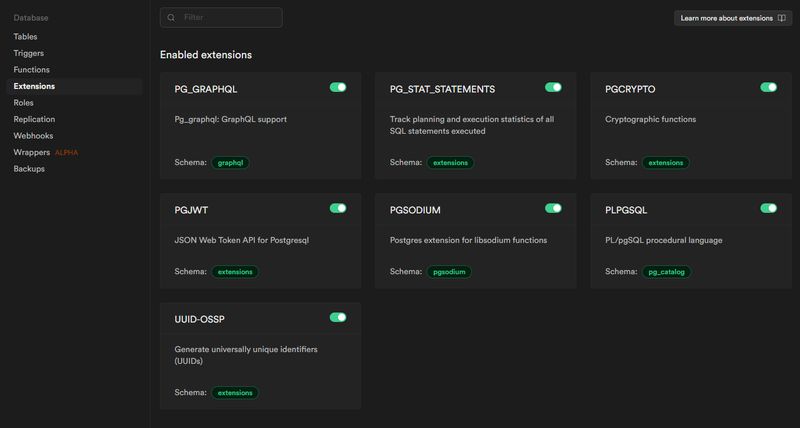
Supabae offers a range of Postgres extensions that you can integrate into your project to improve its functionalities. You can find the extensions on your Supabase dashboard here.

You can find additional libraries that integrate with Supabase in the community resources, which also contain tutorials and sample projects built using Supabase.
Conclusion
Supabase has proven to be an innovative and powerful platform, providing serverless services and improving the development experience. In this article, we have reviewed different features that make Supabase a tool to consider for your next application. With its seamless and easy integration, range of authentication options, Postgres compatibility, and real-time capabilities, Supabase offers all the necessary tools to build small or large-scale applications with improved scalability and performance.
Supabase open-source nature and self-hosting allow developers to customize the library further to meet your applications' specific needs. So, if you're seeking a next-generation serverless development platform, Supabase is the ideal choice to embark on your development journey.
You can check the official documentation to understand how to use Supabase for different development environments or the additional features it offers. I also provide a link to the GitHub Repository and a live link for the application from the article to play with.
 Cloudflare D1
 DynamoDB
 Firebase Realtime Database
 MongoDB Atlas
 PlanetScale
 Supabase
 Xata.io