Knowledge Hub
Firebase Realtime Database
Firebase Realtime Database Review and Features
Written by Ezinne Anne Emilia
Last update: 6/7/2024
| Feature | Firebase Realtime Database | |
|---|---|---|
Infrastructure, Underlying technology Cloud Infrastructure, database system and underlying egine | Nodejs, Google Cloud, Scala | |
Serverless Support Serverless and Edge computing support | ||
API | REST API | |
Edge Functions Serverless functions that run closer to the user, reducing latency and improving performance. | Cloud functions | |
Developer Experience | ||
Database type | OLTP, OLAP | |
Data model Databases store data in models, such as Relational, Columnar or Document based | Document based, NoSQL | |
CLI Command Line Interface tools that allow developers to perform tasks and manage the tool via the command line. | Firebase CLI | |
Languages, APIs The languages supporting the database and API interface for inter-process communication | JavaScript, Swift, Kotlin, Java, C++, Objective-C | |
Query language Supported query language such as SQL, MQL, PartiQL, | JSON | |
ACID compliant ACID is a set of properties of database transactions intended to guarantee data validity despite errors, power failures, and other mishaps | ||
Self-hosting Support for self-hosted Database instance | Doesn't have support | |
Backups | ||
Security & Compliance Offerings | ||
SOC2 Service Organization Control 2 compliance for managing customer data. | Apart from App indexing | |
Multi-factor authentication Support of the cloud-histed database for multi-factor authentication | ||
Encryption Cryptographic security at rest and on transportation level | HTTPS, TLS | |
SSO | SAML-based SSO solution | |
Monitoring and analytics | ||
Log retention Query log retention usually keeps lofs of operations for debugging and replication purposes | Document level history 30 days retention | |
Statistics Tools and APIs for analysing and monitoring of Database performance | Web based monitoring tools | |
Scalability | ||
Replication and Partitioning | Region groups | |
Originally, Firebase was functioning as a backend service. It would provide an application with a backend service to make it full-stack. Now, it is also improving your application's user experience and making your work much easier. This article will serve as a guide to the core features of Firebase.
Benefits of Firebase
Before you begin, you might want to know some of the benefits of Firebase:
- Real-time synchronization - Firebase syncs your data across your clients and devices immediately after you make changes. It makes it possible to work with the data.
- Reliability - Firebase is backed by Google, as is their database. This means guaranteed security and protection of data. Also, Firebase leverages other products by Google, such as Google Cloud, to provide a vast range of features.
- It has a free tier - Firebase has quality features that they could charge for. But they make provisions for using some of their features for free. With those features, you can build a functional application at no cost until you decide to upgrade.
- Multi-platform - Firebase offers its services for multiple platforms, which include mobile, web, and iOS. It means that whichever platform you wish to run your code on, you can use Firebase to set it up.
- Frontend developers' favorite - Firebase provides backend services for developers building full-stack applications for their clients. Especially for front end developers - it helps them build standard applications in so many ways.
Setting up Firebase and creating a project
To set up Firebase, you need to create an account on the Firebase console. After creating an account, you can move on to creating a project.
To create a project, click on Add Project.

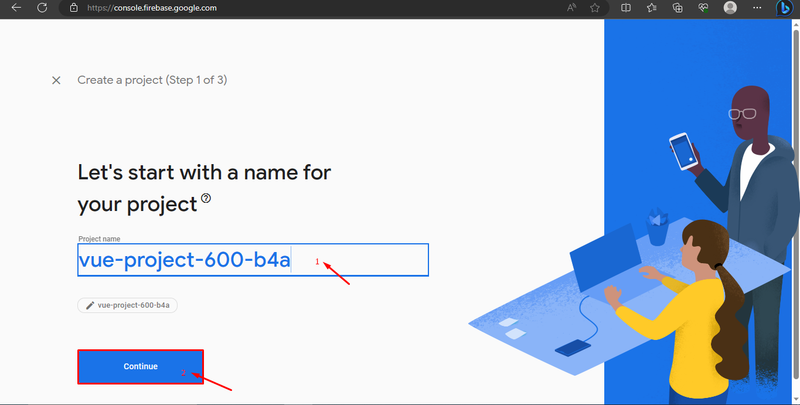
Give your project a name and click on Continue.
Google analytics is optional, you can enable it if you want but I will turn it off.
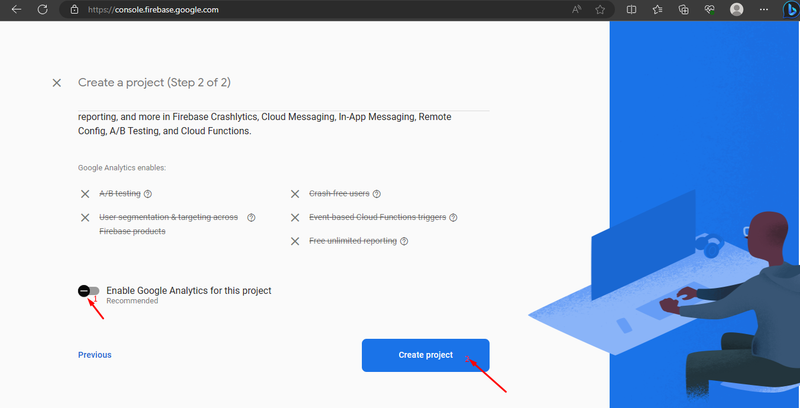
Click on Create project. That will create the project for you.
Setting up your web app for Firebase
Now, you need to set up your web app for Firebase. Firebase uses npm, cdn, and config SDKs. I will be using npm in this guide. To use npm, you need node.js and npm on your device. If you have yet to install them, then install nvm and Node.js using this guide.
After the installation, you need a module bundler like Webpack, which you will install.
To begin, open your code editor and create a folder. For this example, I will name it "firebase-database." Inside this folder, create another folder called dist. Within the dist folder, create a file named index.html and save it. Next, create another folder called src. Inside the src folder, create a new file named index.js and save it as well. Ensure all the files are saved in their respective folders. Now, run the command npm init -y to install the package.json file, which will contain all the necessary dependencies. Finally, install Webpack and its CLI by executing the following command:
npm install webpack webpack-cli --save-devAfter installation, you should see a package-lock.json file. Now, create a new file and save it as webpack.config.js with the following code:
const path = require('path');

module.exports = {
mode: 'development',
entry: './src/index.js',
output: {
  path: path.resolve(__dirname, 'dist'),
  filename: 'bundle.js',
  },
};
The code above is a custom configuration file for Webpack to bundle your application and serve on a webpage. You need to create a bundle file, but first, add this in your index.html.
<script src="bundle.js"></script>Open your package.json file and add this under the scripts object.
"build": "webpack"This is how your package.json file should look like:
{
  "name": "firebase-database",
  "version": "1.0.0",
  "description": "",
  "main": "main.js",
  "scripts": {
    "test": "echo \"Error: no test specified\" && exit 1",
    "build": "webpack"
  },
  "keywords": [],
  "author": "",
  "license": "ISC",
  "devDependencies": {
    "webpack": "^5.88.0",
    "webpack-cli": "^5.1.4"
  }
}
Then run npm run build and it will generate a bundle.js file.
This is the project structure:
firebase-database/
├── src
│   └── index.js
├── dist
│   ├── bundle.js
│   └── index.html
├── node_modules
├── package-lock.json
├── package.json
└── webpack.config.js
Firebase real-time database
Firebase Real-Time Database is a cloud-hosted NoSQL database. As the name implies, Firebase works in real time, synchronizing events and allowing developers to build applications that update data instantly across multiple clients or devices. As it is NoSQL, it displays data in JSON format.
Core features of the Firebase Real-time database
- Real-time data synchronization offline and online. Offline synchronization is for Android devices.
- It scales your data by segmenting the database.
- It integrates with other Firebase services.
- You can only access your data in a single geographical zone.
Creating database structure on the web
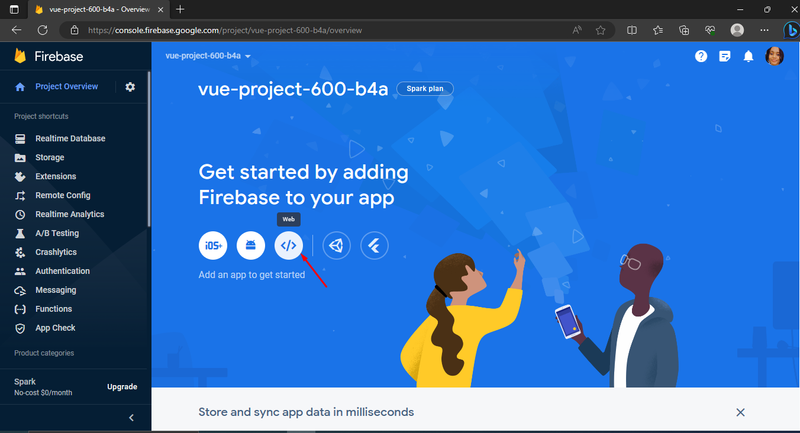
To add a web app, click on the web logo to add a web app.
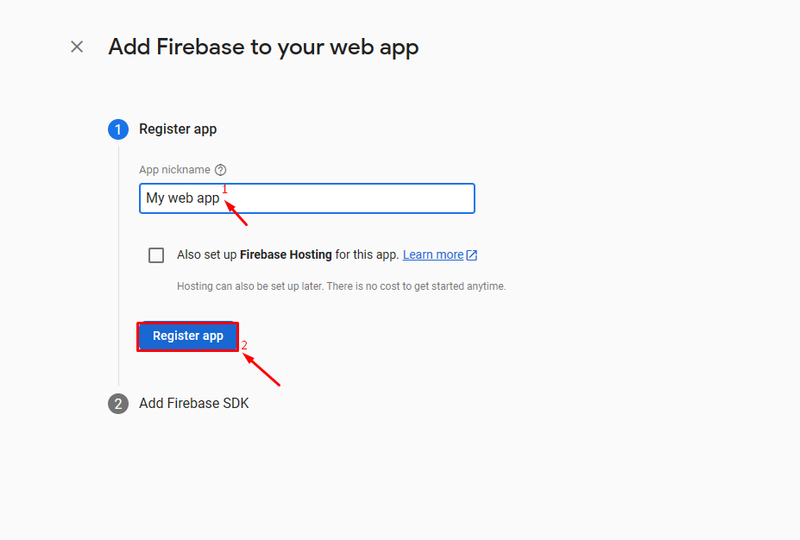
Give your web app a nickname and hit Register app.
Click on continue to console, then select Realtime database. You can add data values in the file.
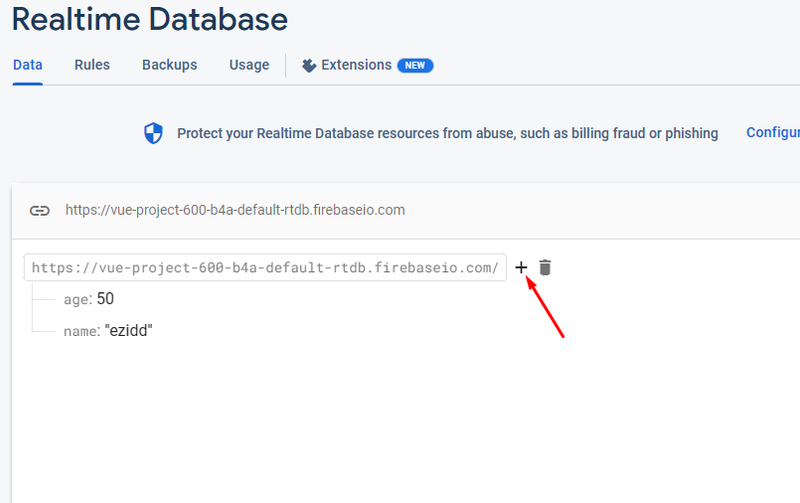
Connecting your app to Firebase
After creating a real-time database and adding values, you need to connect your web app to Firebase.
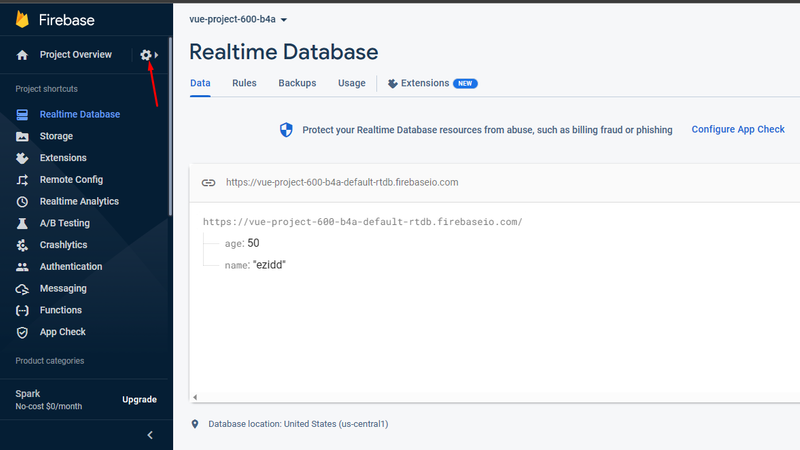
In the Real-time Database dashboard, click on the settings icon on the left.
Go to Project settings and in the SDK setup and configuration, select npm, as you will be using npm to connect your app to Firebase.
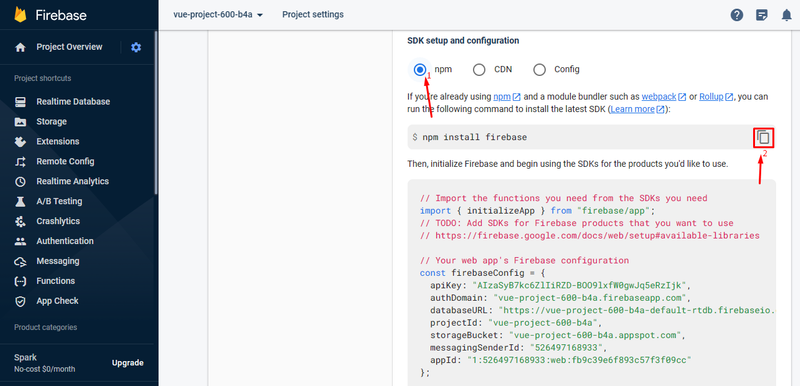
Run npm install firebase in your terminal to install firebase SDK in your app.
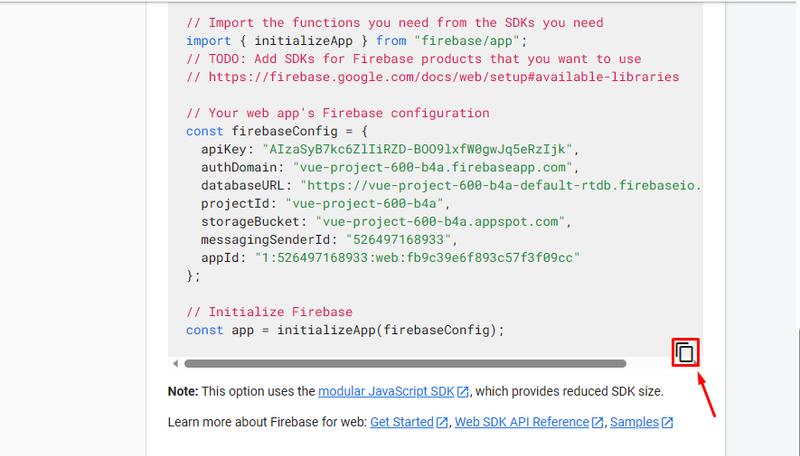
Finally, copy the code that is marked in the above image and paste it into your index.js file.
Now you have connected your app to Firebase.
Reading files from the Firebase real-time database
You can read files on the real-time database and access the values in the database.
For example, I added details for a blog in the database and I want to access it.
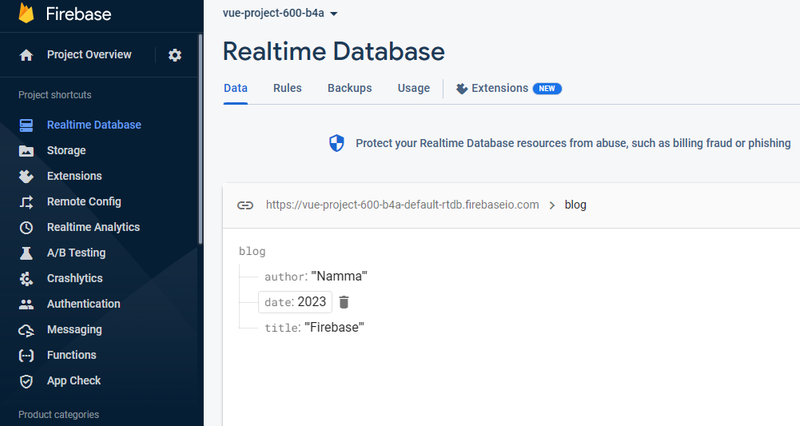
I could do that using the onValue(). With this, I could get the data in my database.
import { initializeApp } from "firebase/app";
import { getDatabase, ref, onValue} from "firebase/database";


const firebaseConfig = {
   …..
};


initializeApp(firebaseConfig);

const database = getDatabase();
const blogDetails = ref(database, 'blog/');
onValue(blogDetails, (snapshot) => {
  const value = snapshot.val();
  console.log(value);
})
This would return an object with the title, author and date of the blog.
Writing files to the Firebase real-time database
Using set, you can overwrite your data in a database which will replace the old details.
function addingNewDetails(title, author, date) {
  const data = getDatabase();
  set(ref(data, "/blog"), {
    title: title,
    author: author,
    date: date,
  });
}

console.log(addingNewDetails("Learning Javascript", "Emily", 2023));
This will overwrite the previous data when you refresh the firebase console.
Cloud Firestore
Firebase Cloud Firestore is a NoSQL database like the Real-time database under the Firebase platform. It stores, synchronizes, and queries structured data for web, mobile, and server development. Since it is NoSQL, it also uses the JSON format.
Core features of Cloud Firestore
Some of the core features are:
- document-based data model
- the synchronization of data happens in real time, both online and offline; offline synchronization is for web, iOS, and mobile platforms
- you can filter and query your data on Firestore
- you can access your database even in another region
Creating collections and documents
You can use the Cloud Firestore to create collections and documents. Select Cloud Firestore in the dashboard and click on create a database.
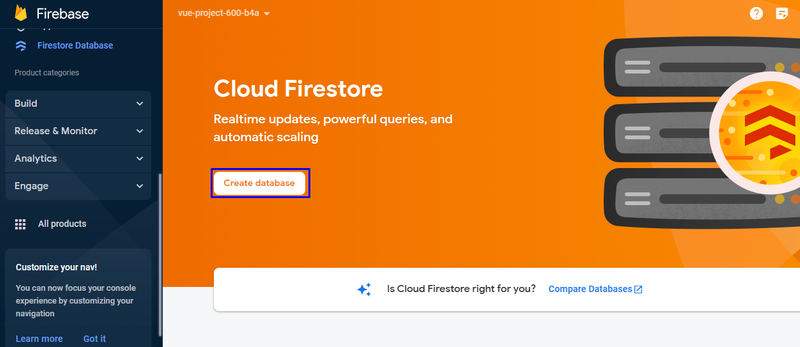
Choose test mode.
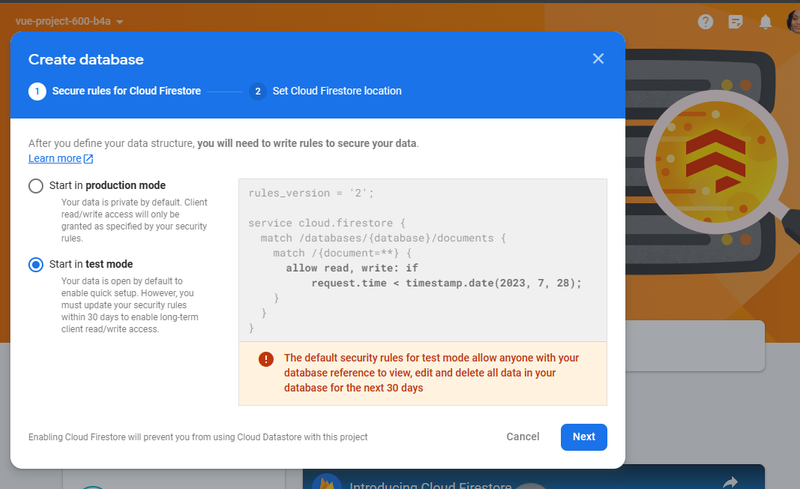
Set a location for the Cloud Firestore and you’ll have your database created.
Now, to create collections for data, click on Start collection and add the values and click on Save.
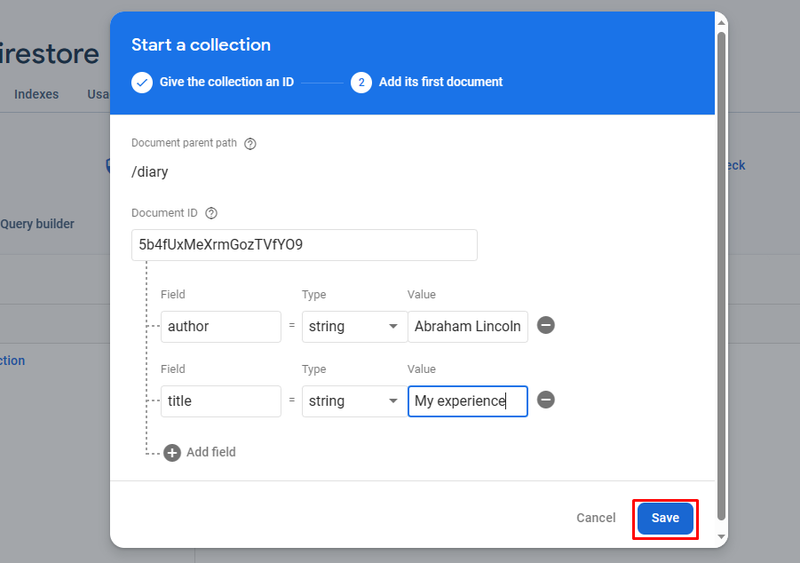
You should see your data on the dashboard after doing so.

Implementing filtering and querying
After setting up the Firestore and adding data to it, you can access it on your program and use the functionalities. To implement filtering and querying in the database, you use the where() and query() methods to select a field you can retrieve data from.
Before that, let’s add an index for the diary collection. Go to your Firebase console and click on the Firestore dashboard, then open the Indexes tab.

Add an index for the fields and add the following code to make a query that will filter faustina.
import { initializeApp } from "firebase/app";
import {
  getFirestore,
  collection,
  query,
  where,
  onSnapshot,
  orderBy,
} from "firebase/firestore";

const firebaseConfig = {
  //replace with your sdk configuration
};

// Initialize Firebase
initializeApp(firebaseConfig);

//init firestore
const database = getFirestore();

//create a reference to collection
const colref = collection(database, "diary");

//making a query that fetches a field
const q = query(
  colref,
  where("author", "==", "Faustina"),
  orderBy("title", "author")
);

//using the onSnapshot function to log the data to the console
onSnapshot(q, colref, (snapshot) => {
  snapshot.docs.forEach((doc) => {
    console.log({ ...doc.data() });
  });
});
Firebase storage
Firebase storage stores and serves user-generated content such as images, videos, audio, and so on for web and mobile applications.
Core features of Firebase storage
- Firebase storage ensures the secure transmission of data by encrypting files at rest and during transit.
- It provides easily accessible download URLs for files. It also supports direct downloads for users.
- You can also associate metadata with files on Firebase storage.
- It uses cloud-based storage.
Implementing file sharing
To implement the sharing of files in cloud storage, you can upload files to cloud storage and get a shareable download URL.
import { initializeApp } from "firebase/app";
import { getStorage, ref, uploadBytesResumables, getDownloadURL } from "firebase/storage";

const firebaseConfig = {
  …..
}

initializeApp (firebaseConfig);

const storage = getStorage();

const metadata = {
   contentType: "image/jpeg"
};

const storageRef = ref(storage, path-of-image-file + file.name);
const uploadTask = uploadBytesResumable(storageRef, file, metadata);

uploadTask.on('state changed', () => {   getDownloadURL(uploadTask.snapshot.ref).then((downloadURL) => {
      console.log('File available at', downloadURL);
    });
  }
);
This will upload the file to your cloud storage and log the download URL to your console.
Firebase Cloud Messaging (FCM)
Firebase Cloud Messaging is a messaging solution you can use to send push notifications and messages to users on various platforms, including Android, the web, and iOS.
Core features of Firebase Cloud Messaging (FCM)
- Cloud Messaging enables you to send push notifications
- you can create and manage device groups on the service
- FCM ensures reliable message delivery
- you can customize notifications by changing the general UI to suit your needs
Setting up push notifications
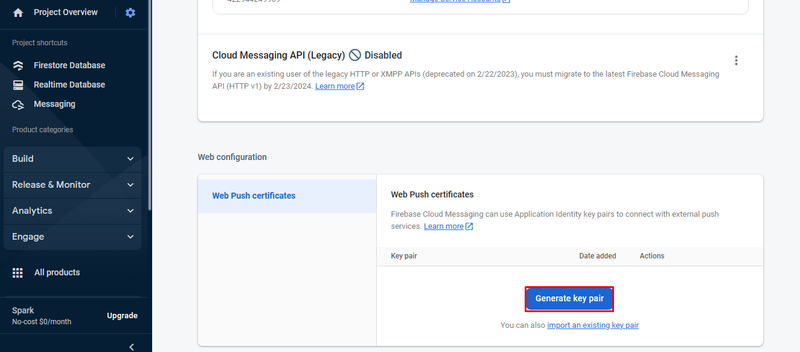
To set up Cloud Messaging for push notifications, you need to get your vapid key.Go to project settings and click on Cloud Messaging.

From there, click on the Cloud Messaging tab.

Scroll down and click on generate key pair. Now you can copy the key pair to your clipboard. Also, you need to add an empty file using firebase-messaging-sw.js.
Firebase authentication
Firebase authentication is a service that offers identification and authentication of users. It facilitates user authentication and user accounts management on web and mobile applications.
Core features of Firebase authentication
- It provides features to manage user accounts, such as creating or deleting a user.
- You can add your custom authentication systems to your application.
- It offers many types of authentication, which include email/password, phone number, and third-party authentication services like Google, GitHub, and so on.
Setting up your user authentication
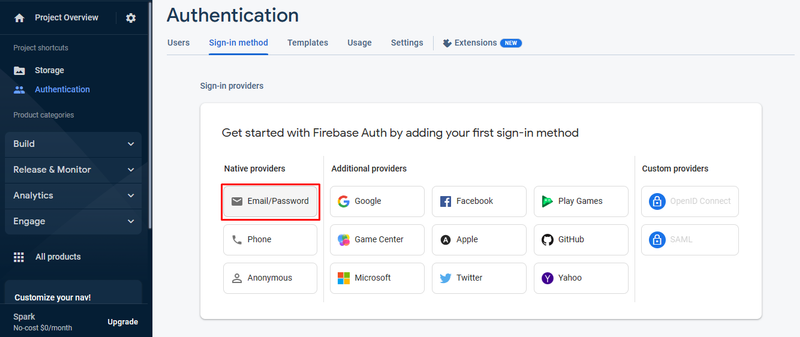
You can set up user authentication on Firebase using various options. In this guide, you will use the email/password sign-in. Let’s go to the Firebase dashboard and select email/password from Native providers and click on save.
Using email/password authentication
To create an email/password authentication, you need to import auth services.
Assuming user details are already provided, you can run these commands:
import { initializeApp } from "firebase/app";
import { getAuth, createUserWithEmailAndPassword } from "firebase/auth";

const firebaseConfig = {
 …….
};

initializeApp(firebaseConfig);

const auth = getAuth();

const userEmail = "wee@mail.com";
const userPassword = "pass234";

createUserWithEmailAndPassword(auth, userEmail, userPassword)
  .then((userCredential) => {
    const user = userCredential.user;
    console.log(`sign up successful`)
  })
  .catch((error) => {
    const errorMessage = error.message;
    console.log(errorMessage)
  });
That will register a user at the firebase authentication dashboard.

To sign in a user, use the signInWithEmailAndPassword function.
import { initializeApp } from "firebase/app";
import { getAuth, signInWithEmailAndPassword } from "firebase/auth";

const firebaseConfig = {
 …….
};

initializeApp(firebaseConfig);

const auth = getAuth();

const userEmail = "wee@mail.com";
const userPassword = "pass234";

signInWithEmailAndPassword(auth, userEmail, userPassword)
  .then((userCredential) => {
    const user = userCredential.user;
    console.log(`sign in successful`);
  })
  .catch((error) => {
    const errorMessage = error.message;
    console.log(errorMessage);
  });
To sign out a user, you use the signOut.
import { initializeApp } from "firebase/app";
import { getAuth, signOut } from "firebase/auth";

const firebaseConfig = {
 …….
};

initializeApp(firebaseConfig);

const auth = getAuth();
signOut(auth)
  .then(() => {
      console.log(`signed out successfully`);
  })
  .catch((error) => {
    const errorMessage = error.message;
    console.log(errorMessage);
  });
Firebase Hosting
Firebase Hosting is a hosting service that allows you to deploy and render your content using a CDN. Firebase hosting works well with other Firebase services, including the Firebase Real-time database, Firebase Authentication, Cloud Functions, and more. So you could build and deploy applications seamlessly.
Core features of Firebase Hosting
- Firebase hosting uses a global content delivery network to distribute your web content across multiple data centers worldwide.
- It provides automatic SSL/TLS certificate provisioning and management.
- You can configure URL rewriting and routing rules. It allows for creating clean, user-friendly URLs and handling dynamic routing.
- Firebase Hosting integrates with popular version control systems like GitHub or Bitbucket. It enables continuous deployment workflows.
Hosting your web app with Firebase Hosting
To host your web app on Firebase, you need to install the Firebase CLI by running the following command:
npm install -g firebase-toolsTo confirm if you have installed it, you can run firebase. It should display a menu if it is installed.
Then, you can initialize hosting, running this command:
firebase init hostingYou will receive a prompt from Firebase cli to create a Google Cloud project. If you do not have an existing project on Google Cloud, click on create new project.
After the hosting has been completed, you should have a firebase.json file and a .firebaserc file.
To deploy your web app, run the following command:
firebase deploy -only hostingAfter that, you can view your site.
Firebase analytics
Firebase Analytics runs analysis on your application to report events about your users. It shows how many users interact with the app and to what extent.
Core features of Firebase Analytics
- It tracks user interactions, such as screen views, clicks, events, and in-app purchases to provide insights on user engagement.
- It measures user actions or conversions, such as completing a registration or making a purchase.
- Currently, conversion events are only available on Apple and Android devices for analytics.
- It organizes your user base using different criteria, such as demographics.
Tracking app usage
You can track your app usage with Google Analytics. To use analytics, you have to enable them.
If you didn't enable analytics during the project creation, then select it from the dashboard and click on enable.
Google Analytics displays a clear analysis of how users interact with your application. You can log events on your local device using the logevents() method.
import { getAnalytics, logEvent } from "firebase/analytics";

const analytics = getAnalytics();
logEvent(analytics, "notification_received");
Other Firebase features and integrations
There are other Firebase features, including:
Machine learning
Firebase's machine learning service makes it possible for Android and Apple developers to add machine learning functionalities to their applications. It covers a collection of pre-trained models that cover various use cases like image labeling, text recognition, and more. It enables you to train your custom models.
Firebase cloud functions
Firebase cloud functions allow you to run backend code in a serverless environment. It enables you to execute custom logic and automate tasks on the Firebase platform.
App check
Firebase app check is a security feature that helps protect your backend resources from abuse and unauthorized access. It allows you to verify the authenticity of requests coming from your app.
Security Rules
With Firebase Security Rules, you can define fine-grained access permissions. This will ensure that only authorized users can read or write data in your Firebase database. It can authenticate users and protect your app's data.
Extensions
Firebase also provides extension features for you to integrate other applications into your app. Examples of such extensions are Algolia Search, BigQuery, and so on.
Crashlytics
Crashlytics is a crash reporting tool that tracks, analyses, and resolves app crashes in real time. So you can identify and fix issues immediately, which will in turn improve your app's stability.
A/B testing
With A/B testing, you may create multiple variations of your app's user experience and analyze their impact on user behavior, engagement, and conversion rates. You can utilize the data to make improvements to your application.
Summary
Firebase continuously adds better features for developers to build fully functional applications that run on different devices. They offer two options: the Blaze or Spark plans. The Spark plan includes services you can use for free. The Blaze plan is for paid services, which include cloud functions. Firebase is popular in the developer community and is the most widely used backend-as-a-service. There are other uses of Firebase on Android and iOS that I did not cover in this guide. You can check out the Firebase documentation for them.
 Cloudflare D1
 DynamoDB
 Firebase Realtime Database
 MongoDB Atlas
 PlanetScale
 Supabase
 Xata.io