Knowledge Hub
View Transition API & meta frameworks: a practical guide
Smooth animations during navigation within a mobile app have been around for some time. However, achieving the same effect on the web has been a challenge, often requiring complex and unique approaches—until now. Enter the View Transitions API, a simple and straightforward browser-based solution.
In this article, I'll explain what this API is and how it works. We will learn to create smooth and simple transitions between states and pages. We will also explore how the View Transitions API pairs up with meta frameworks like Astro and Nuxt.
Get ready for a fun and exciting ride with transitions.
- What is the View Transitions API?
- View transition examples
- Create your first view transition
- How view transitions work behind the scenes
- SPA view transitions
- MPA view transitions
- Customizing view transitions with CSS animations
- Named view transitions
- View transition and accessibility
- Enhancing with JavaScript when CSS isn’t enough
- How to disable view transitions
- View transition "Gotcha"
- View transition in Astro
- View transition in Nuxt
- View transition in SvelteKit
- Browser supports
What is the View Transitions API?
The View Transitions API allows you to add animated transitions between two states of visual DOM changes. These changes could range from something as small as adding a new element to the DOM, to bigger changes, such as navigating from one page to another.
To illustrate this, consider the following scenarios:
Adding elements with view transitions
In the following video, clicking buttons adds an <img> element to the page. One button employs the View Transitions API, while the other does not.
Navigating pages with view transitions
For bigger changes like page navigation, the View Transitions API truly shines. The following video shows the contrast between navigation with and without the API. I made the transition slower to highlight the effect.
The API is available in Chrome 111 and newer versions, so you can easily add it to your website using just a few lines of code as a progressive enhancement. This way, your site gets an upgrade, and you won't need to worry about browsers that don't support it yet.
This API was initially designed for Single-Page Applications (SPAs) but now it works also for Multi-Page Applications (MPAs).
View transition examples
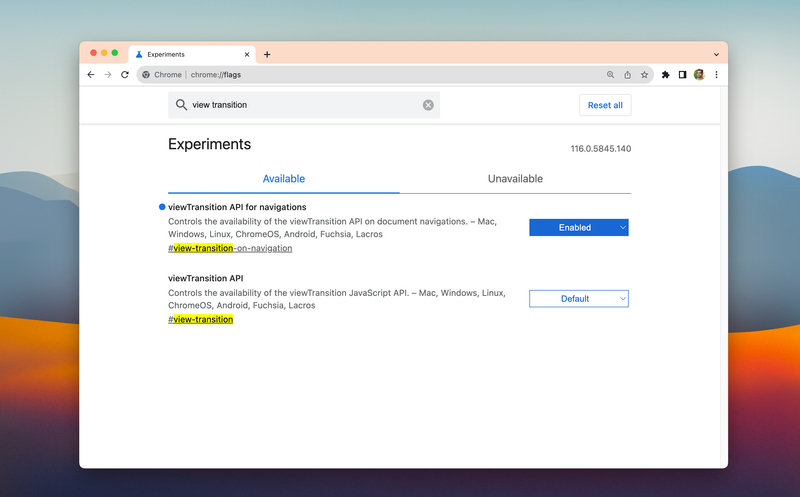
Let's dive into some examples that'll get you excited about this API and help you understand its significance and possibilities. To try out these demos, make sure you're using the latest Chrome browser version and have enabled the viewTransition API for navigations flag.
Type chrome://flags in your browser's address bar, find the viewTransition API for navigations and change it to Enabled.
Let's start with two examples that illustrate the original intention behind the View Transitions API. This API was designed to introduce smooth transitions between different states in single-page applications.
These two demos have been crafted by Maxi Ferreira, and you can access the source code for both of them on GitHub. You'll find the link to the first demo's source code here, and you can interact with the demo directly through this link.
Here is the second demo:
Its source code is also on GitHub, and here is the live version if you want to give it a spin.
The previous demos were built using Astro. Now, let's explore the fact that you can achieve similar results even with websites that aren't built on any web frameworks. Here's a demo to showcase this:
You can play with the demo here.
Are you ready for something surprising? The demo you've just seen didn't use any JavaScript at all. It was a simple multi-page website built using HTML and CSS.
Now, here's the same demo, but this time with just a few lines of JavaScript added to enhance the transitions and make them more refined:
You can also find this demo here.
As you saw in the examples, the View Transition works great in route-level scenarios. However, I'd like to illustrate that you can also leverage this API at a more granular level, even down to an atomic scale—to create more exciting interactions.
For example, let's check out this demo made by Adam Argyle. You can see its code on CodePen.
He is using this API to add transitions to a drag-and-drop component.
Here's another neat example by Adam—a number counter.
There are more and more great examples, but I won't overwhelm you with them right now. I'm sure you're all set to learn how this API works and how to use it. Let's get started!
Create your first view transition
Before we get into how a view transition works, let's try something simple to see that it's actually quite straightforward.
Imagine we want to make an image appear on the page when we click a button. Normally, the image would just pop up without any fancy effects. Now, let's see how we can use this API to make the image transition smoothly.
Here is the HTML:
<button>Add image</button>In JavaScript, let's add an <img> element to the page once this button is clicked:
const button = document.querySelector('button');

button.addEventListener("click", addImage);

function addImage() {
	const newImage = document.createElement("img");
	newImage.src = "https://source.unsplash.com/random";
	document.body.appendChild(newImage);
}
Now, we only need to call the document.startViewTransition() method when we want to append the element to the page, like the following:
function addImage() {
	const newImage = document.createElement("img");
	newImage.src = "https://source.unsplash.com/random";

	document.startViewTransition(() => { // This kicks off the view transition
		document.body.appendChild(newImage);
	});
}
As you see in the demo below, you'll notice a smooth fade-in transition when you click the button.
Working with the View Transitions API is incredibly straightforward. However, before we create more examples, let’s take a moment to understand the underlying mechanics of how this works.
How view transitions work behind the scenes
The View Transitions API might sound a bit mysterious, but once you understand how it works and create a few demos yourself, you get a good grasp of it. Now, let's peek behind the curtain to see what's happening.
When you trigger a view transition, like when you call a document.startViewTransition(), the browser takes a snapshot of the current page state. Think of this as a quick photo of what's on the screen right now.
Then, the magic begins. The callback function you provided in document.startViewTransition() gets called. This is where you can change things on the web page. The browser cleverly pauses rendering during this callback to prevent any flicker, and it does this very quickly.
Once your callback has done its thing, the browser takes another snapshot, but this time, it's of the new page state, the one you just changed. The browser uses these snapshots to create a special structure that's like an overlay on top of the page. This structure includes the old snapshot and the new one, stacked on top of each other.
This structure has different layers, like a tree of pseudo-elements. Each has its purpose, but we won't get into the details now. The important thing is that this overlay sits over everything else on the page.
::view-transition
└─ ::view-transition-group(root)
   └─ ::view-transition-image-pair(root)
      ├─ ::view-transition-old(root)
      └─ ::view-transition-new(root)
The old snapshot (::view-transition-old) and the live representation of the new state (::view-transition-new) start their own special dance. The old image fades out (like turning down the opacity from 1 to 0), and the new image fades in (increasing the opacity from 0 to 1). This creates that familiar cross-fade effect.
Once this animation finishes, the overlay is removed, revealing the final page state underneath. It's cleverly done so that there's no time when both the old and new content exist together, which helps avoid issues with accessibility, usability, and layout.
Here's a visual that can make it easier for you to grasp these layers. Created by Bramus on Codepen:
Now comes the really neat part, the animation is controlled by CSS, and you can change how it looks.
For instance, you can make the cross-fade last longer like this:
::view-transition-group(root) {
	animation-duration: 2s;
}
And that's how the View Transitions API works its magic! It captures snapshots, applies your changes, animates them with a cross-fade, and presents the final result smoothly.
If you're curious about what each of those pseudo-elements does, here's a quick explanation for each:
::view-transition-group- animates size and position between the two states.::view-transition-image-pair- provides blending isolation so the two images can correctly cross-fade.::view-transition-oldand::view-transition-new- the visual states to cross-fade.
SPA view transitions
Using view transitions in a SPA is not very different than our simple demo in the previous example. In a single page application, you use JavaScript to dynamically change the DOM to the new state, which can be done by adding or removing elements, changing class names, changing styles, etc., but this all happens in a single function, so again you can wrap startViewTransition around that function.
Here's an example:
function spaNavigate(data) {
	// Fallback for browsers that don't support this API:
	if (!document.startViewTransition) {
		updateTheDOMSomehow(data);
		return;
	}

	// With a transition:
	document.startViewTransition(() => updateTheDOMSomehow(data));
}
Now, the browser takes a look at the initial page, then gazes at this new page and animates between the two. After that, it moves us to the new page.
MPA view transitions
Most of the demos you've seen so far were transitions within the same document, a concept that was initially proposed and implemented in the browser. However, there's an expansion to this API called "Cross-document View Transitions," which allows you to add transitions while navigating across different documents. In other words, this means you can also add transitions to multi-page applications.
To see this in action, let's create a demo that we'll use throughout this article. I've put together a website consisting of several web pages, all without relying on any frameworks. These are just plain HTML and CSS. Here is the preview of the website here, and you can see the code on GitHub.
To enable the view transition between these pages, all you need to do is add the following meta tag to the HTML <head> of your document:
<meta name="view-transition" content="same-origin">Let’s check out the demo.
Remember that at the time of writing, you need to use Chrome and enable the View Transitions API for navigations flag, as I explained at the beginning of the article.
Did you catch the smooth cross-fade effect in this demo? Pretty easy, isn't it?
This approach is known as the declarative way of adding view transitions. It works automatically and doesn't require any JavaScript. Just declaring the meta tag does the trick.
This isn't the end of the story. The View Transitions API allows you to customize your transitions and even create animations for page elements during navigation. Let's explore how to do that.
Customizing view transitions with CSS animations
You might not always want the default cross-fade animation. Thankfully, the View Transitions API gives you the power to shape the animations the way you want, using the pseudo-elements in your CSS.
You'll be working with ::view-transition-old() for the state that's leaving and ::view-transition-new() for the state that's coming in.
Let's give our demo a makeover and switch the animation from a cross-fade to a sliding one:
@keyframes fade-in {
  from {
    opacity: 0;
  }
}

@keyframes fade-out {
  to {
    opacity: 0;
  }
}

@keyframes slide-from-bottom {
  from {
    transform: translateY(50px);
  }
}

@keyframes slide-to-top {
  to {
    transform: translateY(-50px);
  }
}

::view-transition-old(root) {
  animation:
    90ms cubic-bezier(0.4, 0, 1, 1) both fade-out,
    300ms cubic-bezier(0.4, 0, 0.2, 1) both slide-to-top;
}

::view-transition-new(root) {
  animation:
    210ms cubic-bezier(0, 0, 0.2, 1) 90ms both fade-in,
    300ms cubic-bezier(0.4, 0, 0.2, 1) both slide-from-bottom;
}
Here is what our demo looks like now:
Here is the live version of the demo and the source code.
Now, what if we want to apply this magic to just a single part of our page, not the whole document?
Named view transitions
Imagine you want an element on one page to morph smoothly into another element on a different page or state. To make this happen, you can use something called a named view transition.
The View Transitions API brings in a new tool called the view-transition-name property. This CSS property lets you assign the same special name to both of those elements. This name is what helps you create your named view transition.
This works for both SPA and MPA applications. Let's break it down by an example.
In this example, we have a small image on one page, and we want it to morph into a larger image on another page.
On the first page:
.image {
	view-transition-name: my-image;
}
On the other page:
.bigger-image {
	view-transition-name: my-image;
}
These two elements can either be the same element with different styles or even entirely different HTML elements. The important thing is that they share the same view-transition-name value, which triggers the view-transition effect.
Remember, you can pick any name you like, just not none. And keep those names unique per page. If two elements on the same page share the same view-transition-name value at the same time, the transition won't happen.
Do you remember the pseudo-elements tree we discussed? You create a new branch when you add another view transition using view-transition-name. Here's what the tree looks like now:
::view-transition
├─ ::view-transition-group(root)
│   └─ ::view-transition-image-pair(root)
│       ├─ ::view-transition-old(root)
│       └─ ::view-transition-new(root)
└─ ::view-transition-group(my-image)
		└─ ::view-transition-image-pair(my-image)
				├─ ::view-transition-old(my-image)
				└─ ::view-transition-new(my-image)
There is also a visualization for this made by Bramus on Codepen that can help:
This means we can customize the new view transition using the new pseudo-elements.
Now, let's apply view transitions to different elements in our demo. Up until now, we've used a single cross-fade animation for the entire page.
Let’s extract our banners from their pages so they can be animated separately. For our banners, we'll apply a slide-in animation effect.
@keyframes slide-from-left {
	from { transform: translateX(-50px); }
}

.banner {
	view-transition-name: banner;
}

::view-transition-new(banner) {
	animation: 300ms cubic-bezier(0.4, 0, 0.2, 1) slide-from-left;
}
Here is the result:
Remember, you don't always need to add view transitions to blend elements. Sometimes, you might only want to add view transitions to elements in the old or the new state, not in both. Think about the testimonials section on the home page or blockquote on the detail page.
Even though our blockquote is only present on a single page, we can add a view transition to animate them as the page loads.
/* This element only exists on the detail page */
.blockquote {
	view-transition-name: blockquote;
}

::view-transition-new(blockquote) {
	animation: 300ms cubic-bezier(0.4, 0, 0.2, 1) slide-from-bottom;
}
You might have noticed that we're not using ::view-transition-old here. We're doing this because we want an animation when we arrive on the page. And when we leave the page, we've chosen not to include the sliding effect on purpose.
Thanks to the View Transitions API, we have the freedom to tailor our view transitions according to our preferences.
As shown in the following video, I've added a few additional view transitions to our demo.
You can view the final version of the demo here and explore its source code on GitHub.
View transition and accessibility
When I look at the last demo myself, I feel like many animations are happening, and I don’t really like it. That's because design isn't my strong suit. This got me thinking about people with Vestibular disorder. No matter how cool an animation looks, it can be a problem for them. These users can tell their computer that they want less motion, and this choice is shown through CSS.
You can stop any transitions or pick a more subtle animation for these users using the prefers-reduced-motion media query.
@media (prefers-reduced-motion) {
	::view-transition-old(),
	::view-transition-new() {
		animation: none;
	}
}
Enhancing with JavaScript when CSS isn’t enough
Looking at our demo, what if we want to add a view transition to the thumbnail you see both on the home and detail page, like in the following video:
Sounds easy, right? We just need to give them both the same view transition name.
Here is the HTML of the two pages:
<!-- index.html -->
<ul class="testimonials">
  <li>
    <a>
      <img class="index-thumbnail"> <!-- thumbnail on the home page -->
    </a>
  </li>
  <!-- ... -->
</ul>


<!-- detail.html -->
<section class="case-study">
	<h1>Case study title</h1>
  <img class="detail-thumbnail"> <!-- thumbnail on the detail page -->
</section>
In CSS:
.index-thumbnail,
.detail-thumbnail {
  view-transition-name: thumbnail;
}
But will the view transition work now?

No, as we mentioned earlier in this post, your view transition names have to be unique on your current page. In this case, on the index page, we have six thumbnail elements (.index-thumbnail). Giving all of them the same name thumbnail in the CSS will break the transition. So, what's the solution?
In this simple case, when the thumbnail is clicked, we can use JavaScript to apply the view-transition-name property to the elements only during the transition.
indexThumbnail.onclick = () => {
  indexThumbnail.style.viewTransitionName = 'thumbnail';
};
This approach guarantees the presence of only one named view transition pseudo-element each time on the page.
Also, we need to remove the .index-thumbnail class from our selectors in CSS to fix the demo:
.detail-thumbnail {
  view-transition-name: thumbnail;
}
You can preview the demo here.
When you click on a .index-thumbnail element, it will get the same name as its counterpart on the detail page, which has the class .detail-thumbnail. This causes the named view transition to work properly.
Does this make sense now? Imagine if all these thumbnails had the same view transition name – how would the browser know which one to morph into the thumbnail on the next page?
You can find the source code of this demo. The script can be found at the end of the index.html file.
How to disable view transitions
The best way to turn off a view transition is to set the view-transition-name property of the element to none.
When we assign a name to elements using this property, they receive view transitions. This even applies to the root element, which is automatically set to root when we activate the View Transitions API on the page.
:root {
	view-transition-name: root;
}
This is the default style from the user agent, and we can cancel it out by giving it a value of none to disable its view transition like this:
:root {
	view-transition-name: none;
}

/* or any elements */
.some-element {
	view-transition-name: none;
}
View transition "Gotcha"
You could come across a few surprising things when using the View Transitions API. I faced an issue where elements didn't scale correctly during a transition. Let's look at an example to understand this better.
Imagine you have a thumbnail that you want to enlarge only in its width on the next page. Here's the demo:
Let's use Chrome DevTools to slow down the animation and see what's happening. In DevTools, press Cmd/Ctrl + Shift + P, search for "animation," and you can debug any ongoing animation on the page. I'll slow down the animation to understand the issue:
Box1 is maintaining its aspect ratio and resizing proportionally, which isn't the desired behavior. We want its height to remain the same while growing in width.
It's important to remember that the element itself isn't morphing into a different element. Instead, it's a snapshot of that element, particularly the ::view-transition-old part in the View Transitions API when the red box (Box 1) appears during the animation. This snapshot is a rasterized image and tends to keep its ratio while resizing.
Now that we understand the snapshot keeps its aspect ratio when we don't want it to, the solution is to tell the snapshot to always have the same height as the real element. We can do this by setting the height to 100%:
::view-transition-old(box) {
	height: 100%;
}
Let’s debug the animation again:
Excellent, the problem is solved! However, we encounter the same issue when transitioning from page 2 to page 1.
This happens because we only changed the height of ::view-transition-old(box). This pseudo-element represents the snapshot of Box1 when moving from page 1 to page 2. But when going from page 2 back to page 1, Box1 is in the new state, not the old one. So, we should target ::view-transition-new(box) to adjust the snapshot of Box1 in the new state (page 1).
::view-transition-old(box),
::view-transition-new(box) {
	height: 100%;
}
This makes the old and new snapshots fit snugly within the Box itself.
Now, our animation behaves as intended:
View transition in Astro
Astro is one of the first meta frameworks that added support for view transitions. In this section, we will learn how to add view transitions in an Astro project.
We'll work with the demo project created during our practical Astro guide and enhance it with view transitions.
Enabling view transitions in Astro
This step is applicable for Astro versions prior to 3.0. If you're using version 3 or above, view transitions are already part of the stable release, and you can skip this step.
First, ensure that your project is set up and running using Astro. To enable view transitions, you need to activate the experimental feature in your configuration.
First, you can upgrade your Astro project like this:
npm install astro@latestOpen your astro.config.js file and add the following line:
import { defineConfig } from 'astro/config';
export default defineConfig({
	experimental: {
		viewTransitions: true
	}
});
Add <ViewTransitions /> component
To apply view transitions globally to your entire site and create the SPA mode, you'll need to include the <ViewTransitions /> component. You can do this by adding the import statement and the component placement in your common <head> or shared layout component. For instance, in our project, we are going to add this to our BaseLayout.astro file. First, let’s import the ViewTransitions:
---

import { ViewTransitions } from 'astro:transitions';

---
Now, we can use the component like this:
<head>
	<meta charset="utf-8" />
	<meta name="viewport" content="width=device-width" />
  <ViewTransitions />
	<title>{pageTitle}</title>
</head>
By including this component, you enable the default cross-fade transition effect between different pages of your website.
Here is what our demo looks like now:
Add individual element transitions
To have control over different elements of the page, Astro gives you a few transition:* directives that you can use in your .astro components.
To provide more specific and visually pleasing transitions, you can assign unique names to different elements that you want to transition between.
For example, in your Astro components, you can add the transition:name directive to elements you want to have transition. This directive adds the view-transition-name CSS property behind the scenes that helps control the transition.
In our project, we would like to have a separate transition for each blog post's title and image. So here is how we do it:
We want to transition the card's thumbnail into the blog image of the article page.
Since the name has to be unique, I will use the postId of each post at the end of each name.
In the index.astro file:
<ul class="blogs">
  {blogs.map((blog) => (
    <li>
      <a href={blog.url}>
        <article class="blog">
          <img
            transition:name={`image-${blog.frontmatter.postId}`}
            src={blog.frontmatter.image.url}
          />
          <h3>{blog.frontmatter.title}</h3>
          <p>{blog.frontmatter.description}</p>
          <span class="">Read more</span>
        </article>
      </a>
    </li>
  ))}
</ul>;
We do the same for the blog image in the BlogLayout.astro file:
<BaseLayout pageTitle={frontmatter.title}>
  <h1 class="title" transition:name={`title-${frontmatter.postId}`}>
    {frontmatter.title}
  </h1>
  <p class="description">{frontmatter.description}</p>
  <img
    transition:name={`image-${frontmatter.postId}`}
    src={frontmatter.image.url}
  />
</BaseLayout>;
This guarantees unique names for our view transitions and here is the result:
We can do the same thing for our titles as well. You can check out the demo here and find the source code on GitHub.
With these named view transitions, enhancing your websites becomes a breeze. But Astro doesn't stop here—you can further tailor animations using the transition:animate directive to override Astro's default animations. Options include morph, slide, and fade.
<main transition:animate="slide">You can even customize these animations, as shown below:
<header transition:animate={fade({ duration: '0.4s' })}>Maintaining State
Astro goes the extra mile by allowing you to share JavaScript state between routes. By using the transition:persist directive, you can maintain components and HTML elements across page navigations.
For example, the following <video> element will continue playing even as you navigate to another page containing the same video element. This functionality works for both forward and backward navigation.
<video transition:persist>
	<source src="video.mp4" type="video/mp4">
</video>
Make sure that you read Astro’s documentation on View Transitions. They have more features available that we can’t fit into this article. As Astro evolves, keep an eye out for updates and optimizations that further improve this feature.
View transition in Nuxt
In Nuxt.js, support for View Transitions was introduced as an experimental feature in the Nuxt 3.4 release, which is still actively being developed, so anticipate potential future changes.
To enable the View Transitions API in Nuxt, you'll need to make an addition to the nuxt.config.js file:
export default defineNuxtConfig({
	experimental: {
		viewTransition: true
	}
})
Once enabled, you get the default cross-fade. You can also apply transitions to specific elements in a manner similar to how you work with CSS. Simply use the style tag within your .vue files like this:
<style>
img {
	view-transition-name: image;
}
</style>
The Nuxt team has provided a demo that you can explore on Stackblitz:
View transition in SvelteKit
SvelteKit, starting from version 1.24, has made a way to integrate the View Transitions API for view transitions.
To enable view transitions in SvelteKit, you can use a navigation lifecycle function called the onNavigate hook, which fires on every navigation just before the new page is rendered.
Add the following code to your src/routes/+layout.svelte file:
import { onNavigate } from '$app/navigation';

onNavigate((navigation) => {
    if (!document.startViewTransition) return;

    return new Promise((resolve) => {
        document.startViewTransition(async () => {
            resolve();
            await navigation.complete;
        });
    });
});
Now, every navigation will trigger a view transition.
You can read more about this on the Svelte blog.
Browser supports
You can check the browser support on caniuse.com. Only Chrome and Edge support the View Transitions API at the time of writing. However, this shouldn't discourage you from considering its use. Progressive enhancement can be a helpful strategy in this situation.
With progressive enhancement, you can add extra features and fancier stuff on top of that basic foundation. This way, users with modern browsers will get to experience the extra cool features, while users with other browsers still get a functional and usable site.
So, even though the View Transitions API might not be supported by all browsers, using the progressive enhancement approach allows you to offer a great experience to everyone while taking advantage of the API's features for those who can enjoy them.
Conclusion
Creating smooth page transitions has always been a goal in web development. The View Transitions API is a big step forward in achieving this. It lets developers add attractive animations to their websites.
If you want to dig deeper into understanding the View Transitions API, then by all means, put some time into reading Jake Archibald’s article on the subject. He is one of the main people behind this API. In this post, I explained what I learned from that article in my own simple words.