Knowledge Hub
Nuxt
Nuxt Review and Features
Written by Miracle Onyenma
Last update: 6/11/2024
| Feature | Nuxt.js | |
|---|---|---|
Written in | JavaScript | |
Template Language The syntax or language used to define the layout and structure of web pages. | vue | |
Based on JS framework | Vue.js | |
Built-in module bundler | Vite, Webpack | |
Static pages (SSG) | ||
Dynamic pages (SSR) | ||
Developer Experience | ||
TypeScript support | ||
Serverless Functions (API) Small pieces of code that run on-demand without managing servers, typically used for API endpoints. | ||
Focus on plugin system | ||
Themes ecosystem | ||
Hot reloading The ability to instantly see changes in the browser without refreshing the page when developing. | ||
Code Splitting The ability of splitting code into smaller chunks to load them only when needed, improving performance. | ||
Content Preview Allows content editors to see live changes to draft content in a staging environment before it goes live. | ||
Builit-in Optimizations | ||
Third-party Script Optimization Optimizing external scripts (like analytics or ads) to improve the performance and loading speed of your website. | ||
Image Optimization | ||
An option to disable runtime JS For certain use cases, like static HTML + CSS websites where interactivity isn't needed, shipping JavaScript is unnecessary. | ||
Critical CSS Extraction Extracting only the CSS needed for the initial page load to improve performance. | ||
Starters or examples with common use cases | ||
Data fetching Methods to fetch data from APIs or other sources, either at build time or runtime. | ||
10+ Headless CMS examples | ||
Authentication | ||
Adding search | Community example | |
Ecommerce | Community example | |
Security | ||
Regular security audits by external researchers | ||
Environment Variables Variables used to configure applications based on different environments (development, production). | ||
Content Security Policy (CSP) | ||
Nuxt started as a simple tool to allow the development of server-side rendered applications with Vue and has grown to be a framework of choice for building production-ready applications.
In this article, we will explore the key concepts, features, and capabilities of Nuxt.js. We'll dive into its history, understand its core functionalities, and learn about its capabilities that can be leveraged to build robust and performant web applications.
What is Nuxt
A Vue-based framework, Nuxt facilitates building high-performance full-stack applications. It handles most of the complex configuration involved in routing, handling asynchronous data, middleware, and more. An opinionated directory structure and TypeScript support ensure an excellent developer experience when building simple or production-ready enterprise applications.
Brief history
Nuxt was developed by Alexandre and Sébastien Chopin and its initial version, 0.0.1, was made available on October 26, 2016. The first version release, Nuxt 1.0.0, was made available on January 8, 2018. It included features like custom layouts, middleware, and several rendering modes, including server-side, static site generation, and Single Page Application (SPA).
With the release of Nuxt 2, the framework had numerous improvements, including the addition of modules to enhance functionality and speed up development.
One significant addition was the introduction of Nuxt Content, which provided a built-in and intuitive way to manage content in Nuxt applications.
On October 11, 2021, the Nuxt team announced Nuxt 3 Beta built on top of Vue 3 and Vite with a Nitro server engine that provides faster rendering and better performance. The stable release of Nuxt 3 was announced on November 16, 2022, and has been receiving regular updates since then, with the latest stable version being Nuxt 3.6 as of June 23, 2022.
Key concepts and features of Nuxt.js
Let’s have a brief look at some important concepts and features of Nuxt which will help us understand its power and capabilities:
Rendering modes
The rendering modes offered by Nuxt include:
Universal rendering
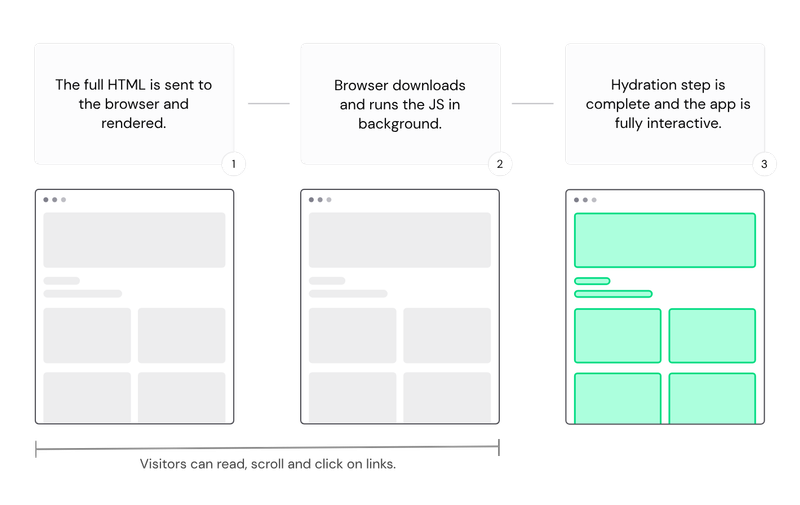
Universal rendering is the default mode for Nuxt applications. The server returns a fully rendered HTML page to the browser, and then Vue.js takes control of the document and enables interactivity. This mode provides better performance, SEO, and user experience.

Universal Rendering - Source: Nuxt Docs
Client-side rendering
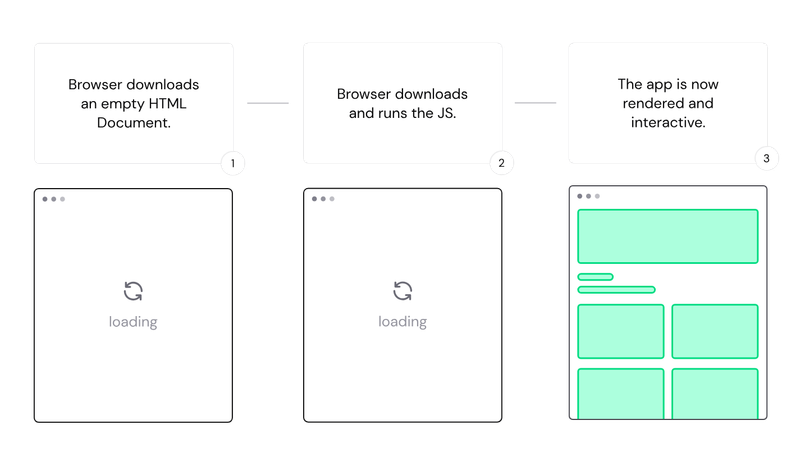
The browser downloads and parses all the JavaScript code and then Vue.js generates HTML elements. This mode is suitable for heavily interactive web applications like dashboards that don’t need indexing or have frequent visits.

Client side rendering - Source: Nuxt Docs
Hybrid rendering
This mode determines how the server should respond to an initial request on a specified URL and provides flexibility, improved performance, and the ability to customize rendering and caching strategies on a per-route basis. This mode is particularly useful for content-oriented websites with dynamic sections.
Edge-side rendering
This is more of a deployment target than a rendering mode made possible with the Nitro server engine that powers Nuxt. ESR in Nuxt 3 brings the rendering process closer to users through CDN edge servers, resulting in faster page loads, reduced latency, and an enhanced user experience.
Automatic routing and dynamic nested routes
In the pages/ directory, you can organize your Vue components according to the desired URL structure of your application. Based on this directory structure, Nuxt automatically generates routes, eliminating the need to manually configure routes.
For example, if you have a pages/ directory with the following structure:
pages/
├── index.vue
├── about.vue
└── products/
    ├── index.vue
    └── [id].vue
Nuxt will generate the following routes:
/maps topages/index.vue/aboutmaps topages/about.vue/productsmaps topages/products/index.vue/products/:idmaps topages/products/[id].vue
The use of square brackets in the file or directory name indicates a dynamic route parameter. It allows you to create dynamic routes with parameters that can vary based on user input or other factors.
Additionally, Nuxt supports catch-all routes by using a file named [...slug].vue. It enables the creation of routes that match any path under that specified route. The catch-all route can be useful when handling various dynamic paths or creating wildcard routes.
Nested routes are also supported in Nuxt. You can define child routes within a parent route, creating a hierarchical structure. By using the <NuxtPage> component, you can display the nested route's component within the parent component. More information on nested routes can be found in the docs.
Data fetching
One crucial Nuxt feature is easy data fetching in both browser and server environments thanks to a built-in library and two composables:
$fetch
$fetch is an alias for the ofetch library built on top of the native fetch API with additional handy features that enable cross-platform usage (browser, Node, and worker environments).
useFetch
This composable allows you to fetch data from any URL using useAsyncData and the $fetch utility. It automatically updates the data when the URL or options change, and supports server-side rendering, caching, error handling, and loading state. You can use it within your pages, components, and plugins, and it is ideal for fetching data that depends on the current route or query parameters. You can also use the transform and pick options to customize the data structure and reduce the payload size. You can learn more about this composable in the docs.
useAsyncData
This composable allows you to fetch data from any async function using the native fetch API or the $fetch utility. A common set of options is accepted as the last argument, similarly to useFetch. Please refer to the doc for more information.
API routes
API Routes in Nuxt are powerful tools for creating server-side logic and handling API requests. Nuxt's server directory provides a convenient way to organize your API-related code, including API routes, server routes, middleware, plugins, and utilities.
In the ./server/api directory, you can define API handlers using files like hello.ts. These handlers export a default function defined with defineEventHandler(). You can use these handlers to return JSON data, and promises, or send a response using event.node.res.end().
For example, you can create a /api/hello route in ./server/api/hello.ts that returns { hello: 'world' }. These API routes can be universally called in your pages and components using the useFetch() function.
Nuxt also supports routes that do not have the /api prefix and can be accessed directly, such as /hello. which can be placed in the ./server/routes directory.
The Server middleware is another feature where files can be added to the ./server/middleware directory to run on every request, allowing you to modify headers, log requests, or extend the request object.
You can enhance the functionality of the server directory by adding server plugins and utilities. Server plugins can be placed in the ./server/plugins directory, and they allow you to extend Nitro's runtime behavior and hook into lifecycle events. Server utilities can be added to the ./server/utils directory, enabling you to define custom helper functions for your server-side code.
Layouts for creating consistent UI across pages
Layouts in Nuxt 3 provide a powerful framework for creating reusable components that help maintain a consistent user interface across multiple pages in your application. By extracting common UI or code patterns into layout components, you can easily manage and update overall design and structure of your application.
Layouts are stored in the layouts/ directory and are automatically loaded via asynchronous import when used. You can add the <NuxtLayout> component to your app.vue file to apply a layout to a page. The layout can be specified either by setting the layout property in the page metadata or by manually specifying it as a prop to <NuxtLayout>.
Middlewares
Middleware in Nuxt is a powerful feature that allows you to perform pre-rendering tasks and modify the request/response cycle during route navigation. With Nuxt's customizable route middleware framework, you can define anonymous, named, and global middleware to handle various aspects of the navigation process.
Anonymous middleware is defined directly within the pages, named middleware is placed in the middleware/ directory, and global middleware is automatically executed on every route change. Middleware runs in a specific order, with global middleware executed first and followed by page-defined middleware. You can control the order of execution by prefixing filenames with a numbering scheme.
Here's an example of a named route middleware in middleware/auth.ts that can be used to ensure authentication before navigating to a protected route and can be referenced in a page file:
// middleware/auth.ts
export default function ({ route }) {
  // Perform authentication logic
  if (!isAuthenticated()) {
    return navigateTo('/login')
  }
}
In the page file, you can reference this middleware using definePageMeta:
<!-- pages/profile.vue -->
<script setup>
  definePageMeta({
    middleware: 'auth'
  })
</script>
Plugin system for extending functionality
Plugins in Nuxt are files that run before the Vue application is created and can inject properties or helpers into the Nuxt app instance. Plugins can be auto-registered by placing them in the plugins/ directory or configured manually using an object syntax. Plugins can also have a .server or .client suffix to specify where they should run, and a numerical prefix to control the order of execution. Plugins can also be parallel, meaning they don’t block the loading of other plugins. Plugins can also use Vue plugins or custom directives, but you need to be aware of some limitations and differences with Vue composables.
Layers
In Nuxt 3, layers allow you to extend a default Nuxt application and reuse components, utilities, and configuration across projects. They provide a way to share presets, create component and utility libraries, and apply standard setups.
Layers are defined in the nuxt.config.ts file using the extends property, where you can specify local layers, npm packages, or git repositories to extend from. This feature promotes code sharing and consistent development practices in Nuxt projects.
You can learn more about Nuxt Layers from the Layers guide and Authoring Nuxt Layers page on the Nuxt docs.
Ecosystem
File based CMS with Nuxt content v2
Nuxt Content v2 introduces a robust file-based CMS that simplifies content management for various websites, such as blogs and documentation. This versatile tool supports multiple formats, including Markdown, YML, CSV, and JSON. It seamlessly integrates with Nuxt applications. An example demonstrates the integration process, including package installation and configuration of the Tailwind typography plugin. Creating content files, rendering content pages, and listing articles are covered, resulting in a comprehensive content management solution.
Here is its repository on GitHub.
Content editing made easy with Nuxt Studio
Nuxt Studio is an amazing platform that enhances content creation for Nuxt applications through its user-friendly interface and real-time previews.
The platform offers multiple views, such as Overview, MDC Editor, and Content File System, catering to different project aspects. The integration process is outlined, including project creation, connection with GitHub, and setting up verification tokens for self-hosted deployments. With Nuxt Studio, content creators benefit from streamlined editing, instant previews, and simplified collaboration.
Nuxt Devtools
Nuxt DevTools, an experimental module within the Nuxt ecosystem, provides an array of insights and features for optimizing Nuxt applications. This module comes pre-installed and enabled in recent Nuxt projects, represented as a subtle bubble at the bottom of app pages. It offers an Overview view, aids in navigating pages and dynamic routes, assists in understanding components and their relationships, provides module, plugin, and hook insights, and simplifies app configuration. Developers can explore and leverage these tools to enhance transparency, optimize performance, and streamline app management.
Nuxt modules

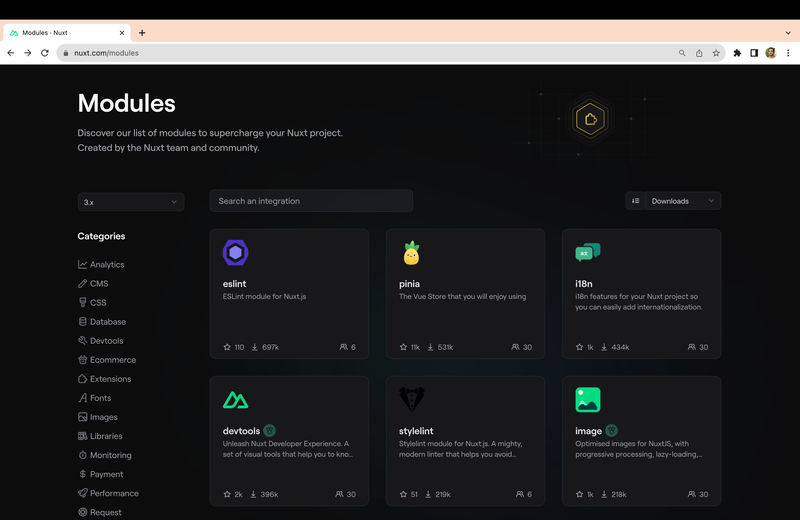
To extend the functionality you can use many available Nuxt modules. The library contains over 140 different modules, from PWA integration to various headless CMS like Prismic, Storyblok, Sanity, and many more.
Nuxt UI

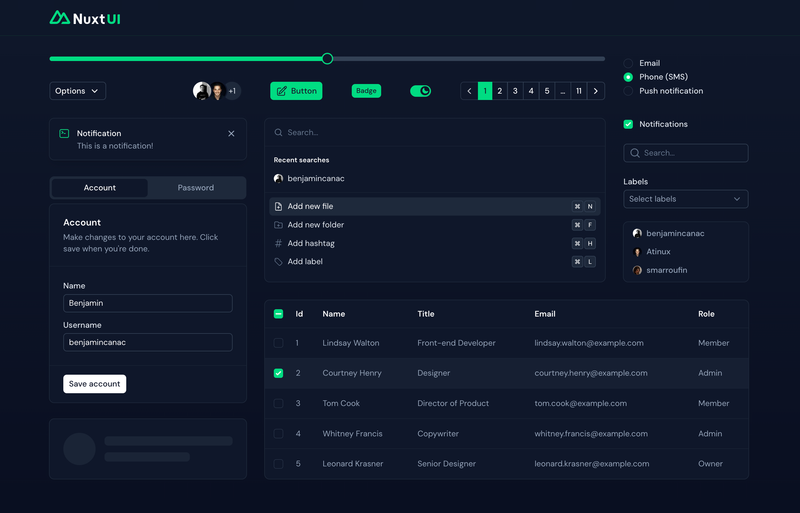
Nuxt UI is a handy toolkit for Nuxt developers. It gives you pre-designed components, icons, colors, and shortcuts to spruce up your app's look and feel. It's built with Headless UI and Tailwind CSS, making it easy to use. You get cool features like dark mode, quick development with HMR support, and support for different languages. It's a real time-saver for creating great-looking Nuxt apps.
Showcase
How to get started
Let's grasp the essentials of Nuxt.js by diving into the process of creating a new Nuxt project. This section will walk you through the necessary steps, ensuring a smooth start to Nuxt exploration. However, before we get to that, it's important to note that there are prerequisites to consider. These include having a recent Node.js version, using VS Code as a text editor, and adding the Volar extension for an optimal setup.
To create a new Nuxt project, execute the following command:
npx nuxi init my-nuxt-projectAfter the project is created, navigate to it using the command:
cd my-nuxt-projectTo proceed with the installation of project dependencies, choose between the following commands based on our preferred package manager:
yarn install

# Using npm
npm install

# Using pnpm
pnpm install
Once the dependencies are installed, initiate the server by running the command:
yarn dev -o

# Using npm
npm run dev -- -o

# Using pnpm
pnpm dev -o
This will open a browser window at http://localhost/3000 (or a different port, if 3000 is occupied), displaying your Nuxt application.
File structure
Nuxt projects adhere to a well-structured directory layout that not only aids in navigating the project's codebase but also facilitates the implementation of best practices for building scalable applications. The organization is essential for maintaining clarity and efficiency as our projects grow. After the installation process, the directory structure looks like this:
my-nuxt-project
├── .nuxt/
├── public/
│   └── favicon.ico
├── server/
│   └── tsconfig.json
├── .gitignore
├── .npmrc
├── app.vue
├── nuxt.config.ts
├── package.json
├── README.md
├── tsconfig.json
└── yarn.lock
As you extend the project, you can further organize it by adding directories and files according to Nuxt's predefined structure that enables you to harness the power of organized development.
Creating pages and routes
With Nuxt's automatic routing mechanism, the process of creating pages and routes is streamlined. By default, the ./app.vue file represents the / route. To expand on this, the ./pages/ directory plays a significant role. When present, Nuxt includes the vue-router dependency, which is especially useful for applications with multiple routes.
Creating pages is simple. For instance, by adding a new ./pages/index.vue file, you enable routing for the application:
<!-- ./pages/index.vue -->
<template>
  <header class="site-section">
    <h1>Hey there! Welcome to my Nuxt site.</h1>
  </header>
</template>
To render pages, utilize the <NuxtPage /> component within ./app.vue:
<!-- ./app.vue -->
<template>
  <main class="site-main">
    <NuxtPage />
  </main>
</template>
Nuxt's file system router efficiently generates routes based on file names and paths, empowering you to build dynamic applications effortlessly.
Deployment
When it's time to deploy your Nuxt project, the process is straightforward. First, build the project using the following command:
npm run build
# or yarn
yarn build
To preview the local build, use:
npm run preview
# or yarn
yarn preview
For generating a static build, use the following command:
nuxi generateAdditionally, Nuxt 3 simplifies deployment by seamlessly integrating with popular cloud providers like AWS, Azure, Netlify, Vercel, and more. Each provider's preset configuration makes deployment a breeze. By selecting a preset within nuxt.config.js, such as in the example below, you can optimize your Nuxt application's performance based on the chosen hosting environment.
// ./nuxt.config.ts
defineNuxtConfig({
  nitro: {
    preset: 'vercel'
  }
})
Nuxt 3's deployment capabilities are truly versatile, empowering you to tailor the deployment strategy to your hosting provider's requirements and optimize your application's performance for the target environment.
Conclusion
In conclusion, Nuxt has emerged as a powerful framework that simplifies the development of modern web applications. Its rich history and continuous evolution have established it as a trusted choice among developers looking to streamline their workflows and create high-performance applications.
We've explored some of the key concepts and features that define Nuxt, from its versatile rendering modes to automatic routing and dynamic nested routes. The ability to efficiently manage data fetching, leverage API routes, create consistent UI with layouts, and implement middlewares showcases Nuxt's commitment to enhancing developer productivity and user experience.
The Nuxt ecosystem is a testament to the framework's adaptability and innovation. With tools like Nuxt Content v2, content management becomes effortless, while Nuxt Studio introduces a user-friendly interface for content editing and collaboration. Nuxt Devtools provides capabilities that enable developers to optimize their applications and gain deeper insights into their codebase.
As we've ventured into the world of Nuxt, we've seen how to get started with installation, understand the directory structure, create pages and routes, and deploy our projects. This introductory journey sets the stage for further exploration, allowing you to harness the full potential of Nuxt for building remarkable web applications.
Further reading and resources
To delve deeper into Nuxt and continue your learning journey, here are some valuable resources:
- Nuxt Official Documentation - the official documentation offers in-depth insights into every aspect of Nuxt, from its core concepts to advanced features.
- Nuxt Content Documentation - dive into the documentation for Nuxt Content v2 to learn how to manage content for your applications efficiently.
- Nuxt Studio - learn more about Nuxt Studio, the visual tool that simplifies content editing and real-time previews.
 Astro
Astro Fresh
Fresh Next.js
 Nuxt.js
 Qwik City
 Remix
Remix SolidStart
 SvelteKit